
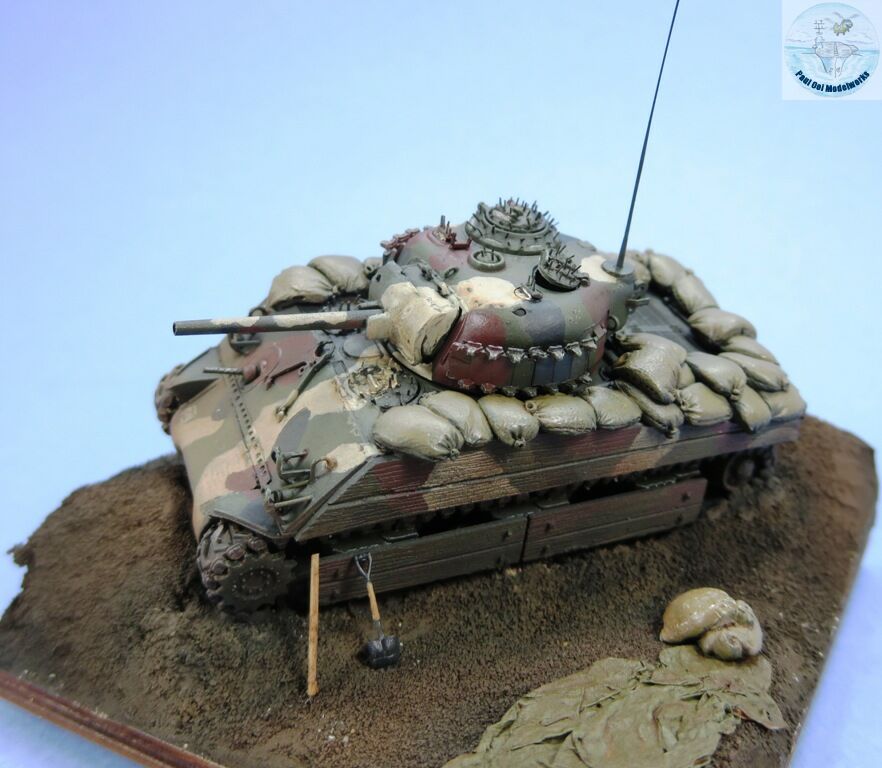
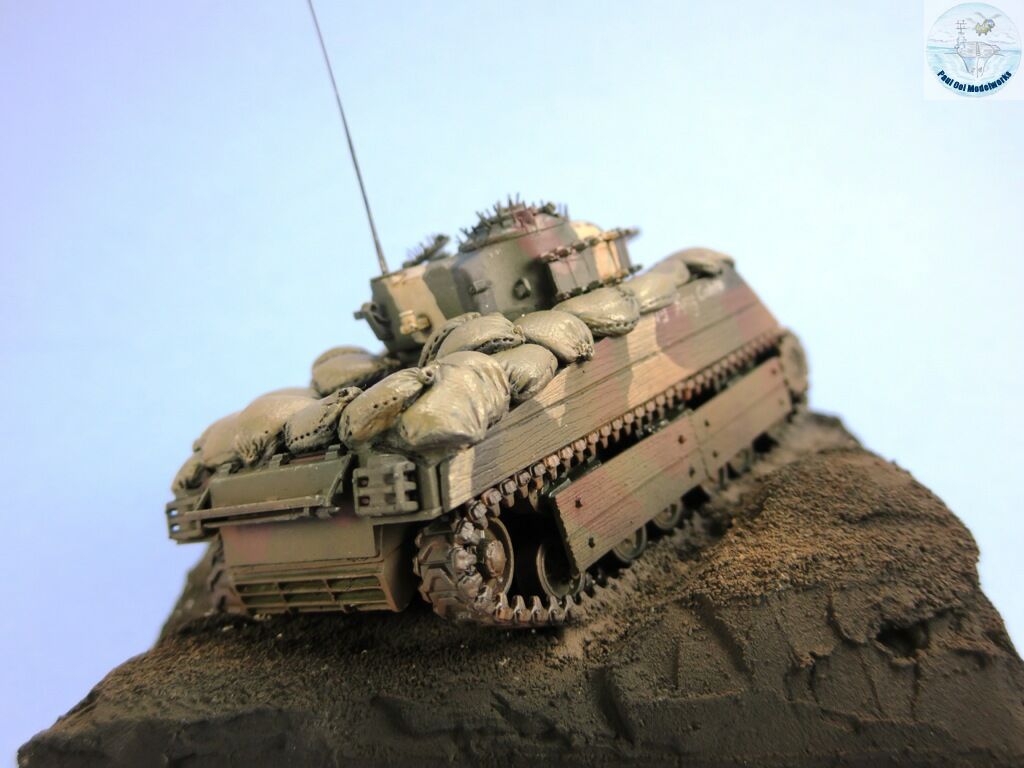
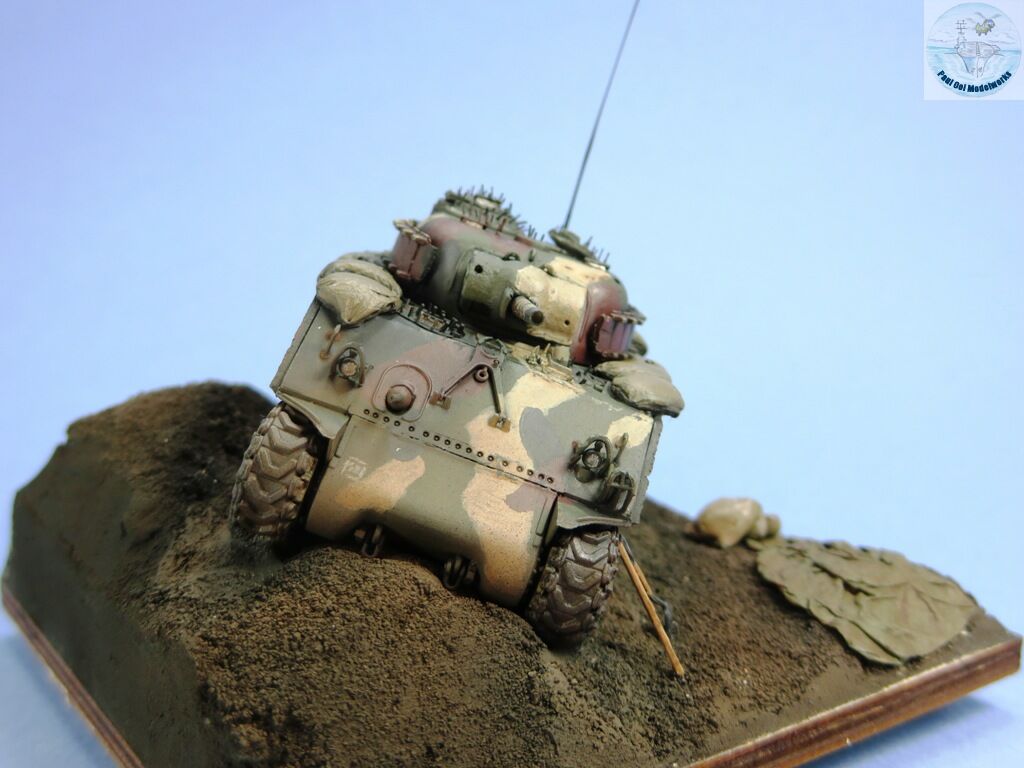
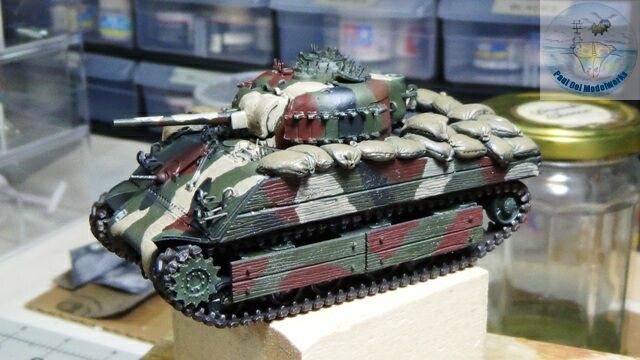
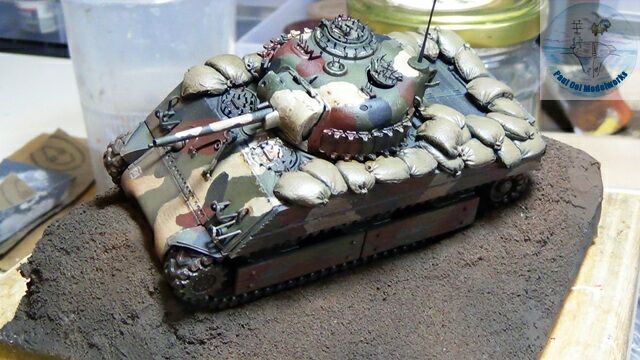
The M4 Sherman, together with the Soviet T-34 and German Tiger I were iconic tanks that dominated the battlefields of WW2. In the case of the Sherman, their sheer numbers and numerous versions make them a special AFV modelling sub-culture in itself. However, I had never built this famous tank in all my 465 plus years of model-making! Until now. It was a toss up between the Pacific M4A3 used in Iwo Jima vs. the British Sherman Firefly Mk.V. I love the off-beat look of the Iwo Sherman with its sides boarded up like a giant moving cupboard and spikes jutting out of all its hatches, underscoring the particularly vicious form of warfare found on that desolate volcanic rock.
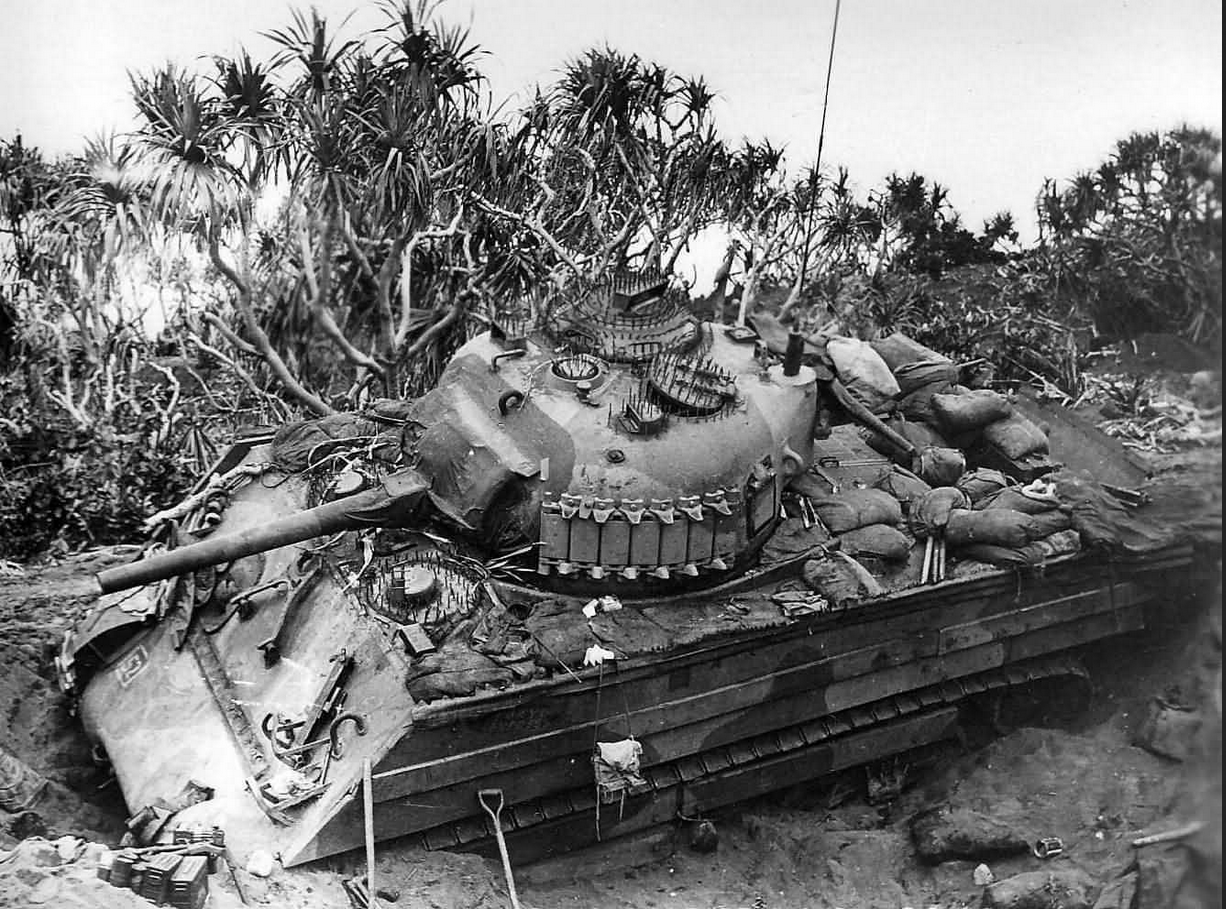
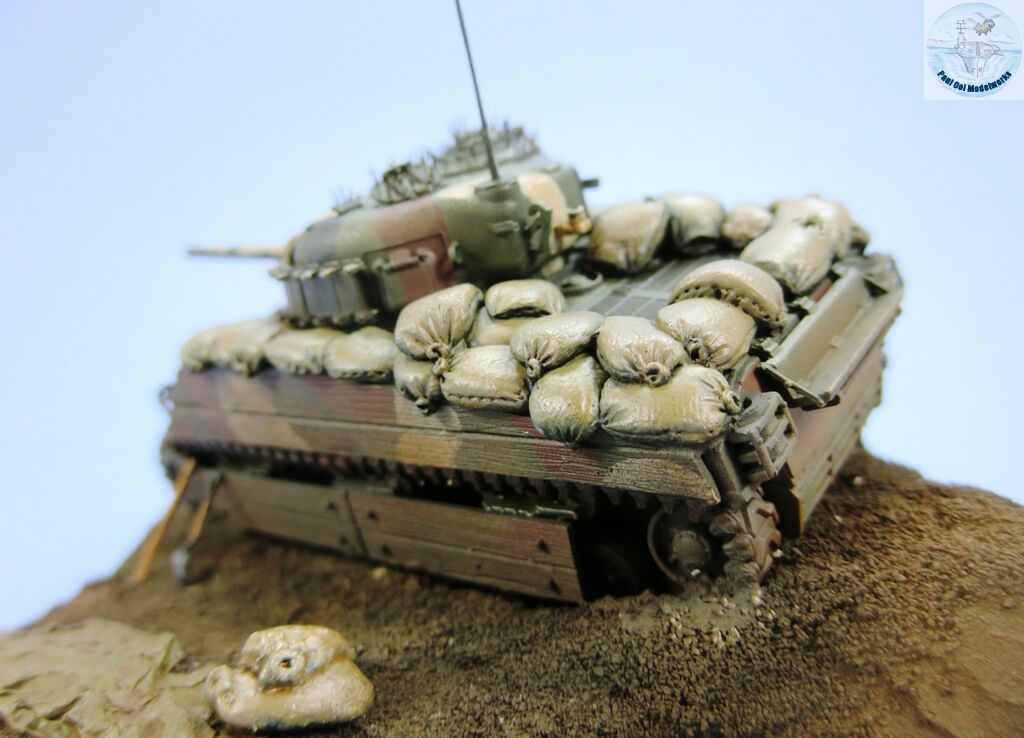
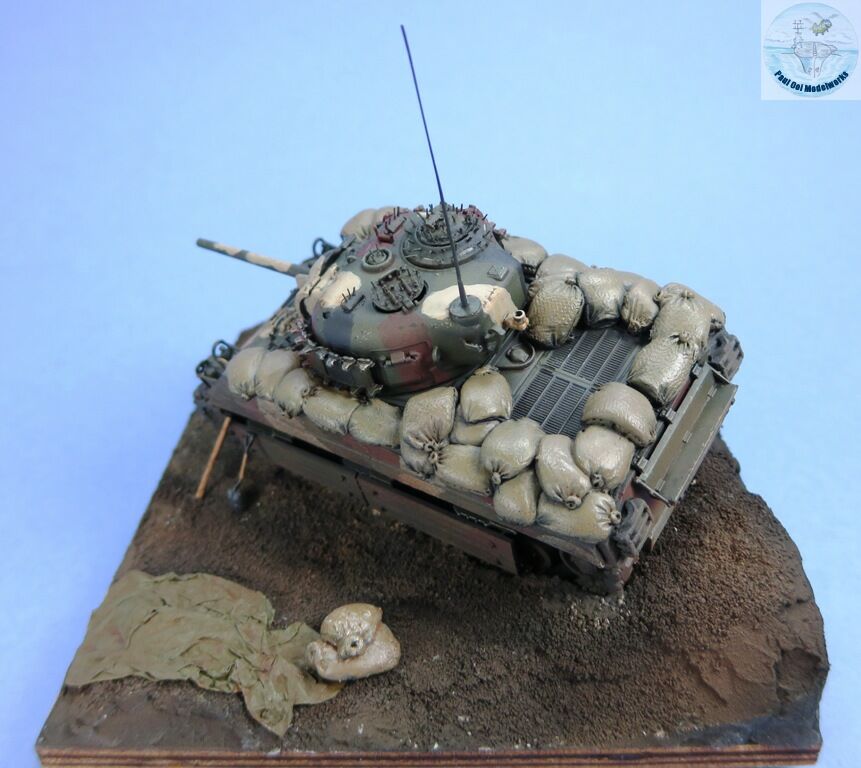
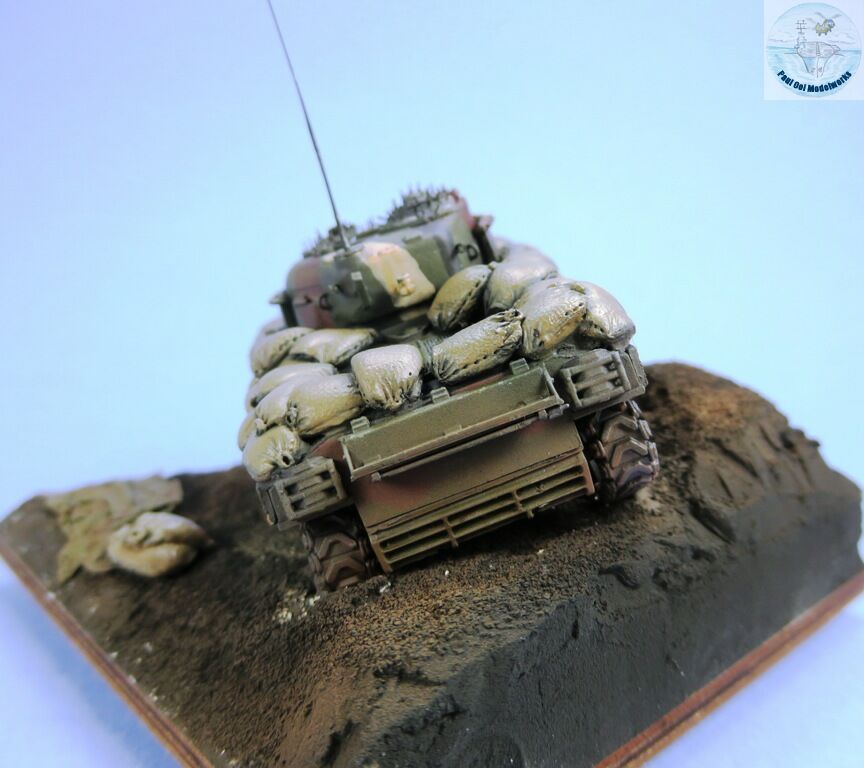
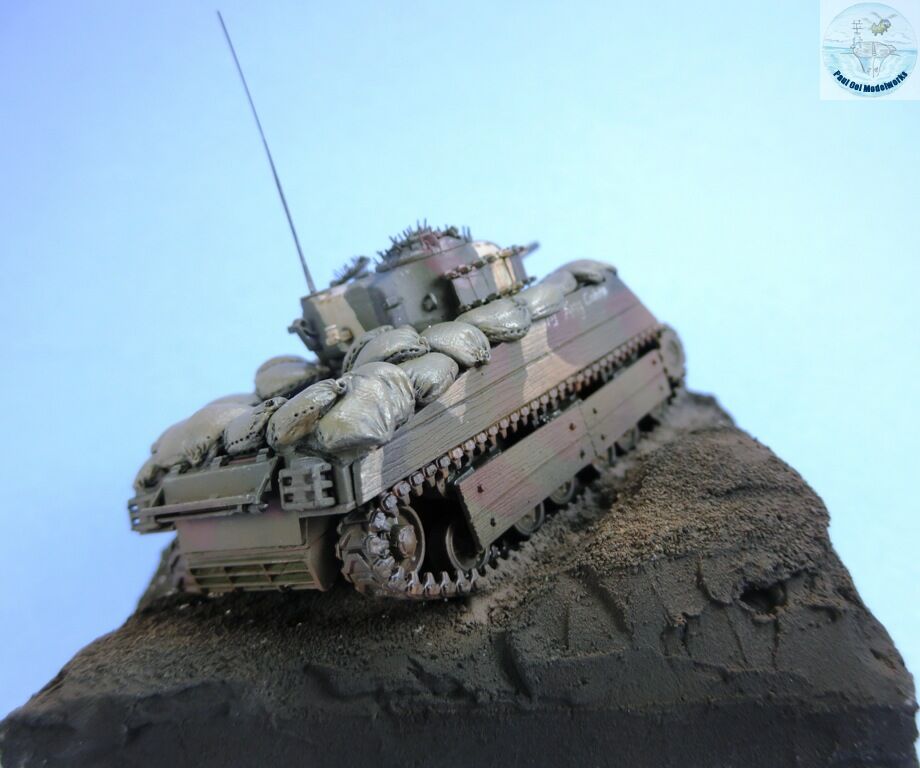
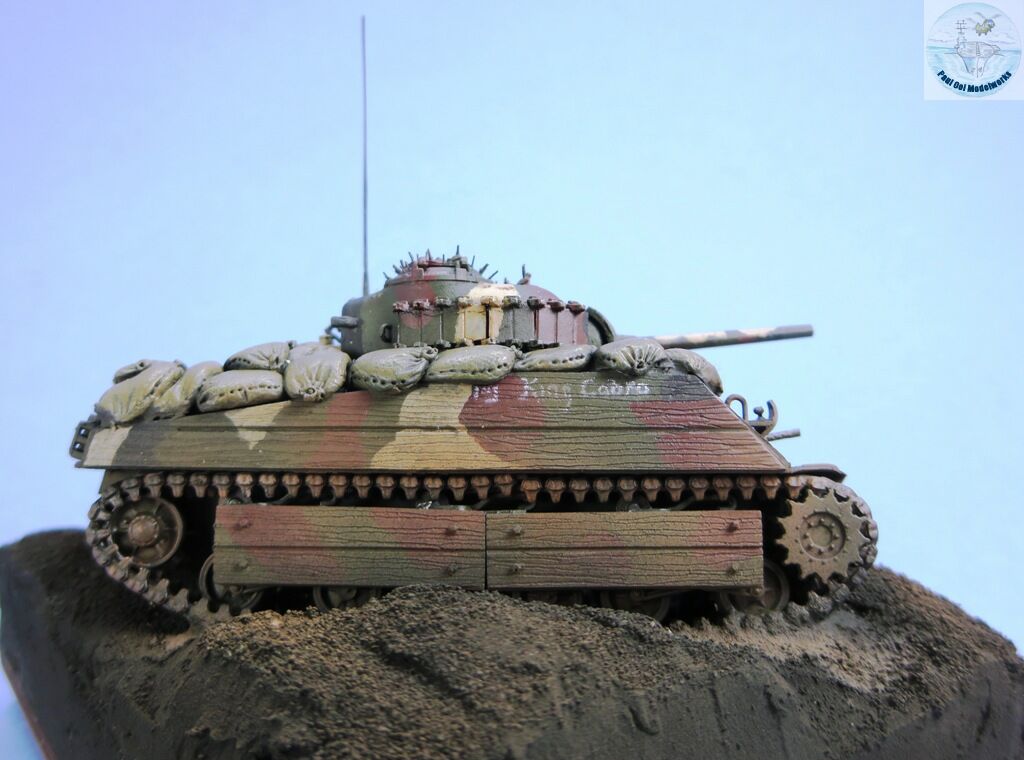
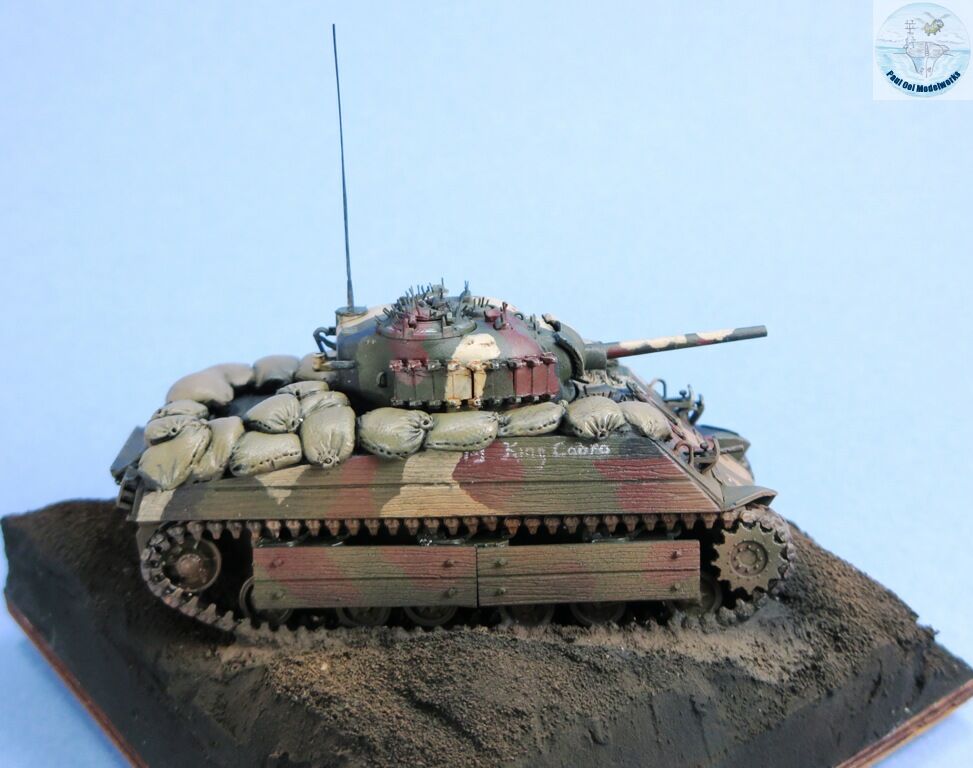
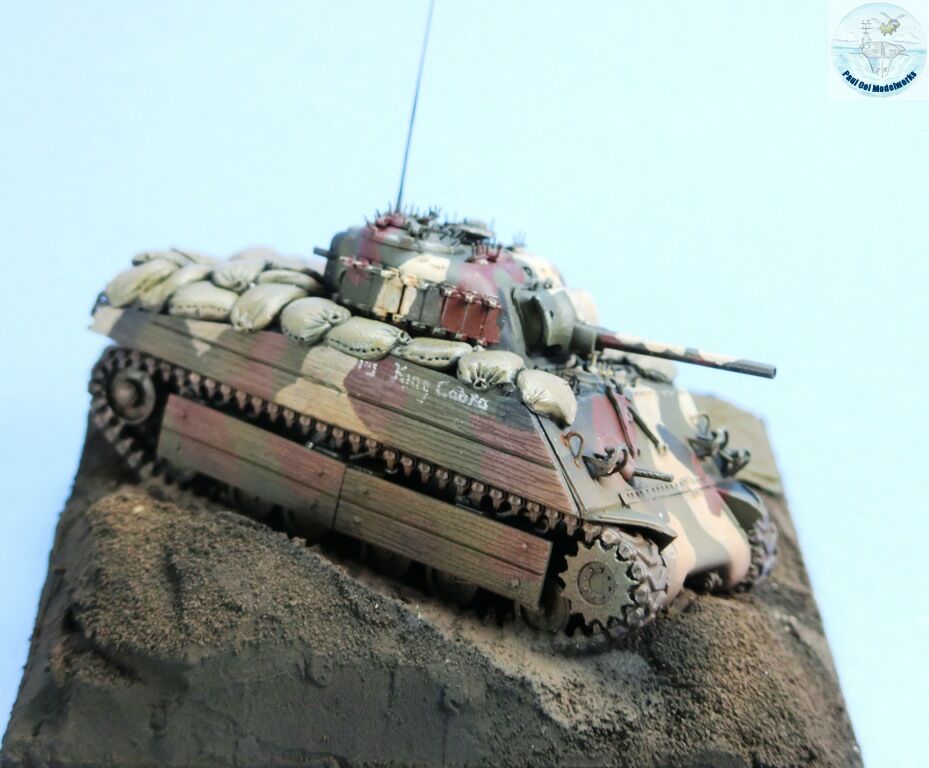
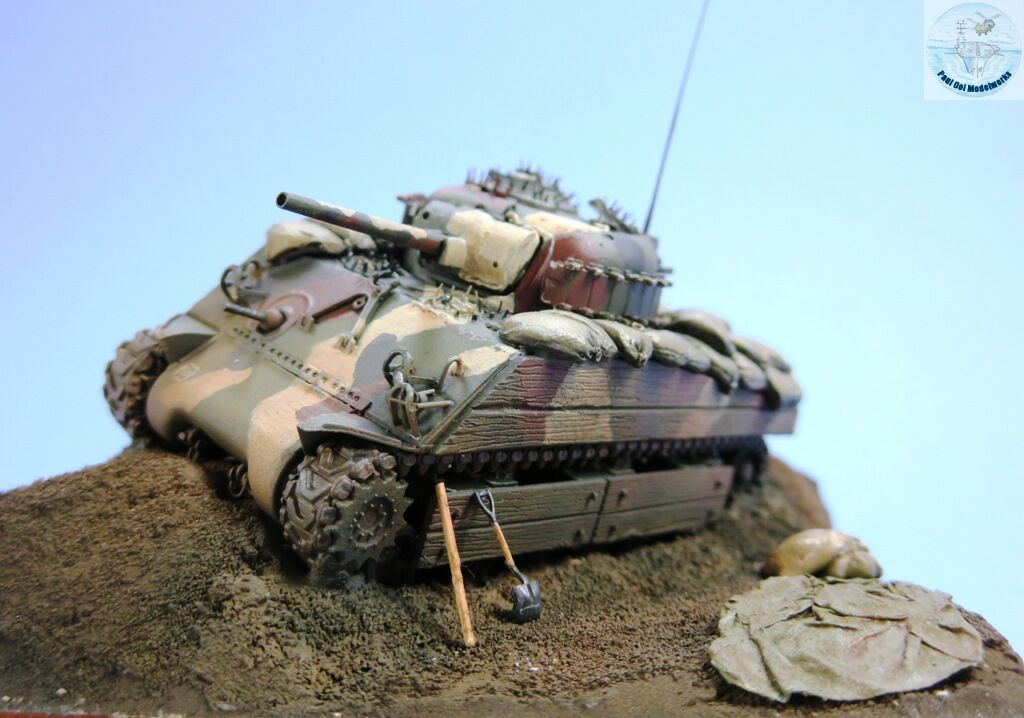
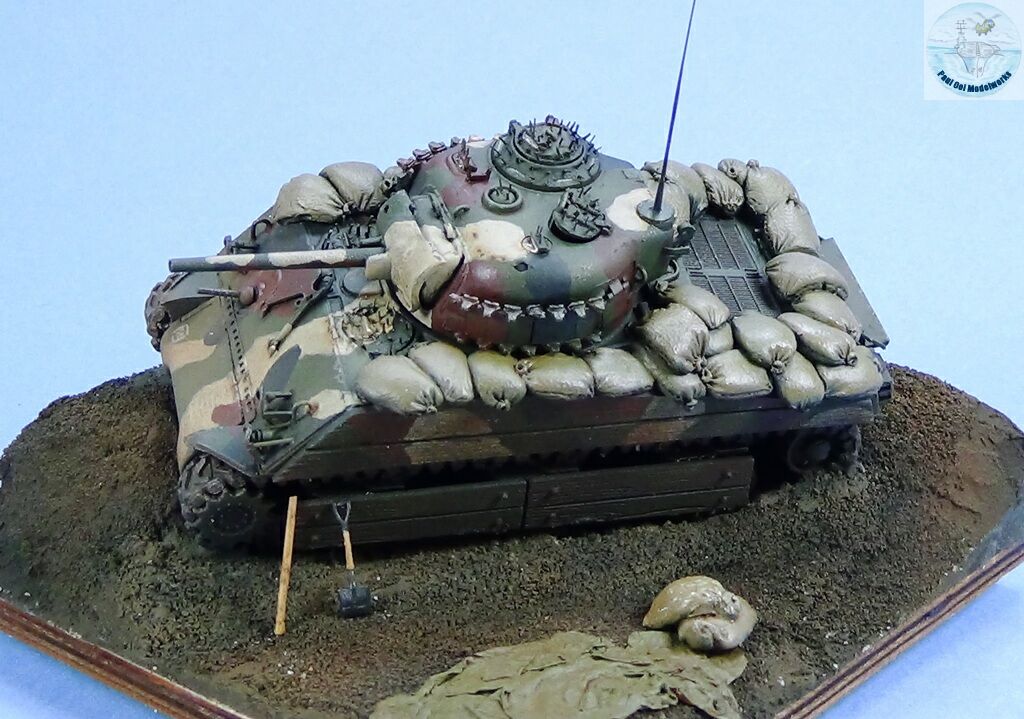
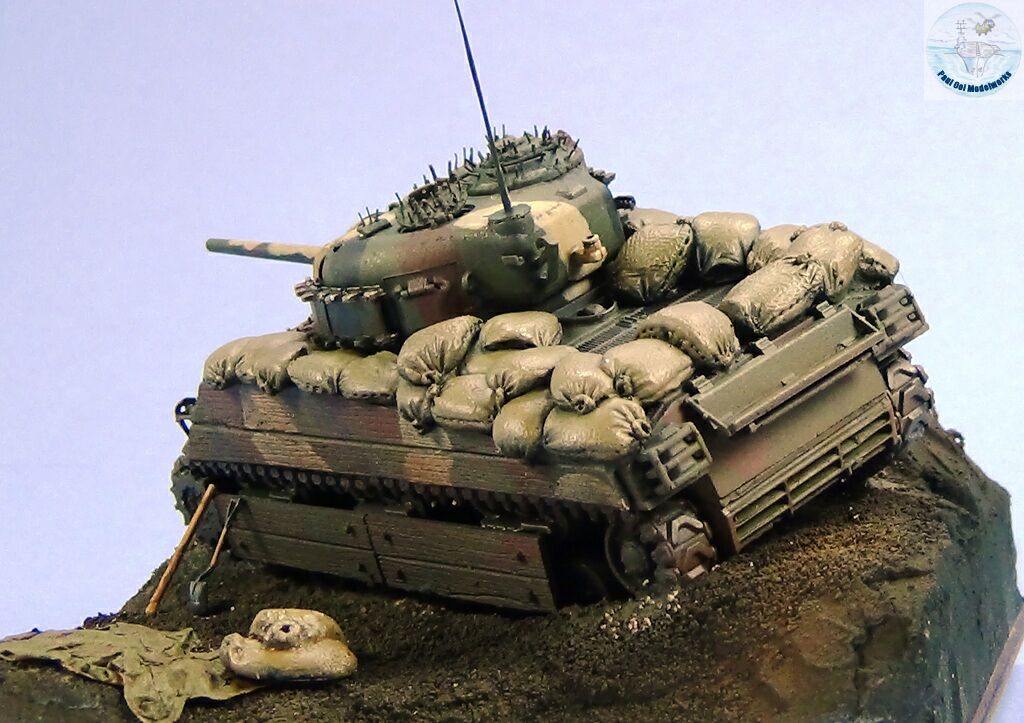
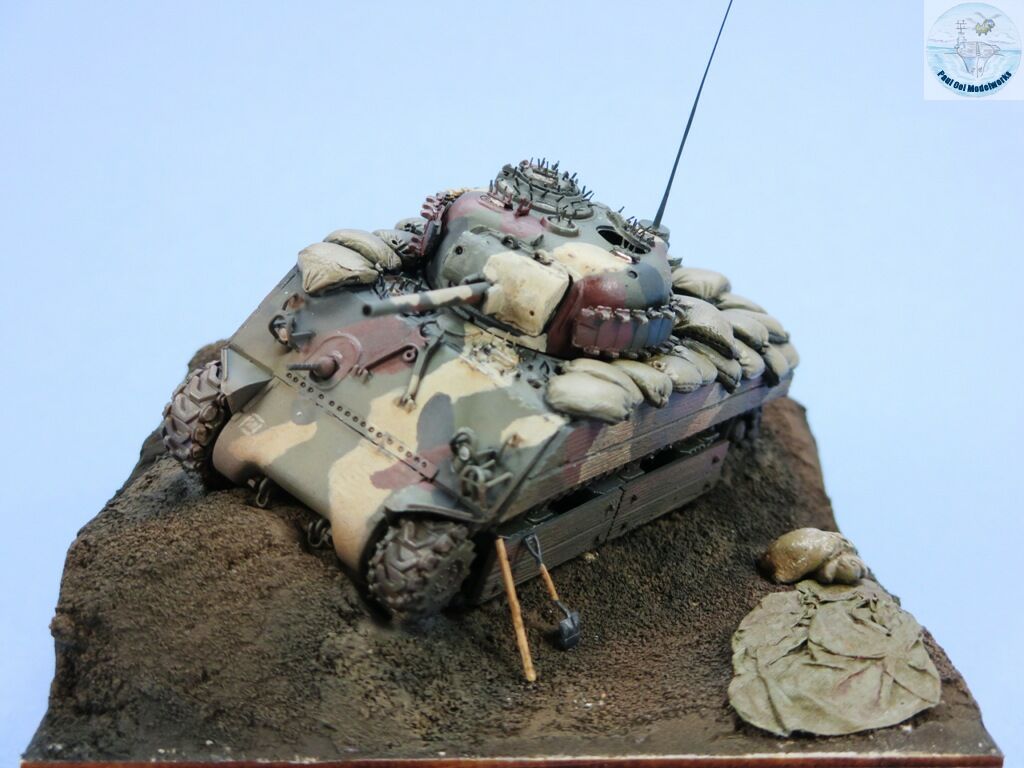
I chose to portray the Sherman stuck in loose dark sand (the “black” beaches at Iwo Jima) inspired by a photograph. There was very little classic tank vs. tank combat in the island-hopping campaign of the Pacific. Instead Shermans acted more like mobile artillery platforms providing infantry with the necessary firepower to take out fortifications. The sand must have collapsed under the weight of the tank, causing it’s running gear to become stuck in the loose sand pit. On Iwo Jima, the USMC painted the tanks in a 4 tone camouflage pattern (probably field-applied) of Marine Green, Light Tan, Red Brown, and Black. The Japanese did not have tanks of the size to equal the M4A3, but they resorted to suicide squads detonating artillery shells in prepared ambush pits, attaching magnetic mines, or simply running up to try and open hatches to lob in hand grenades. The USMC Shermans countered by firing lots of HE rounds into anything that looks like a pit or cave, attaching wooden boards to thwart magnetic attachment, and the pesky spikes to make it inconvenient to open a hatch in the heat of battle.
Gallery


Construction Notes
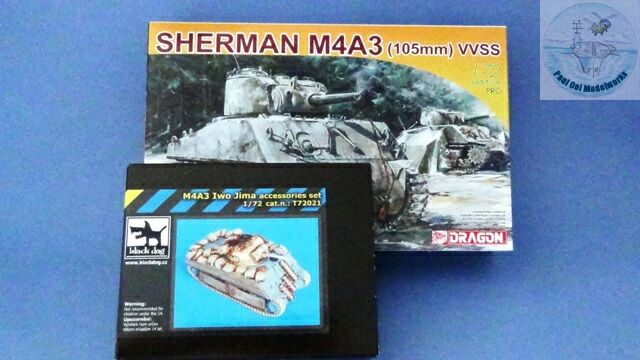
I chose the 1/72 scale M4A3 (105mm) HVSS kit from Dragon as my basic hull since it is closest to the Pacific Shermans on Iwo Jima. The kit itself had a 105mm howitzer that was replaced by the resin 76mm gun that was supplied by the Black Dog Iwo Jima kit. The Dragon Sherman kit was very well molded and generally fitted very well. The M4A3 Iwo Jima Accessories Kit with a whole resin turret, gun, spikey hatches, track sections, sandbags and wooden side boards are a must if you are attempting the Iwo Jima version. I ended up not using the resin turret (almost identical to the kit part) since the lower ring was slightly distored in could not fit easily onto the plastic hull ring. There were no suitable decals for the Iwo Jima Shermans, so I hand-penciled some of my markings and they were really minimal since they got obscured in a short time in the unrelenting heat and dust on the island. References for the different “styles” of camouflage on Iwo Jima were derived from the reference sheets of Bison Decals.
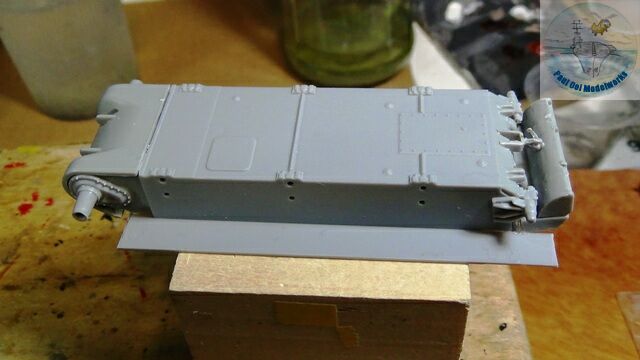
I start by building the hull tub assembly, making sure to get the upper and lower halves properly aligned and pressed together using masking tape.
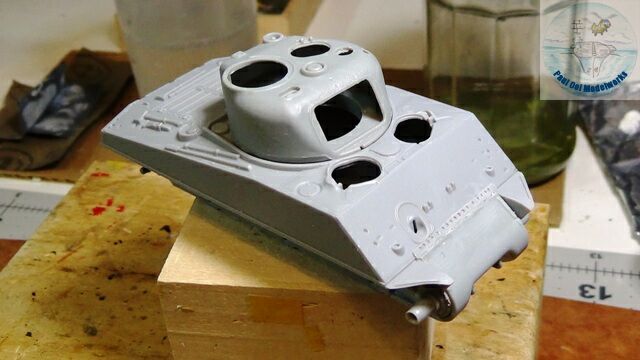
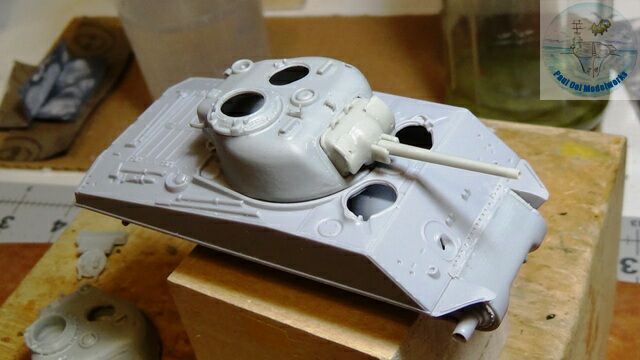
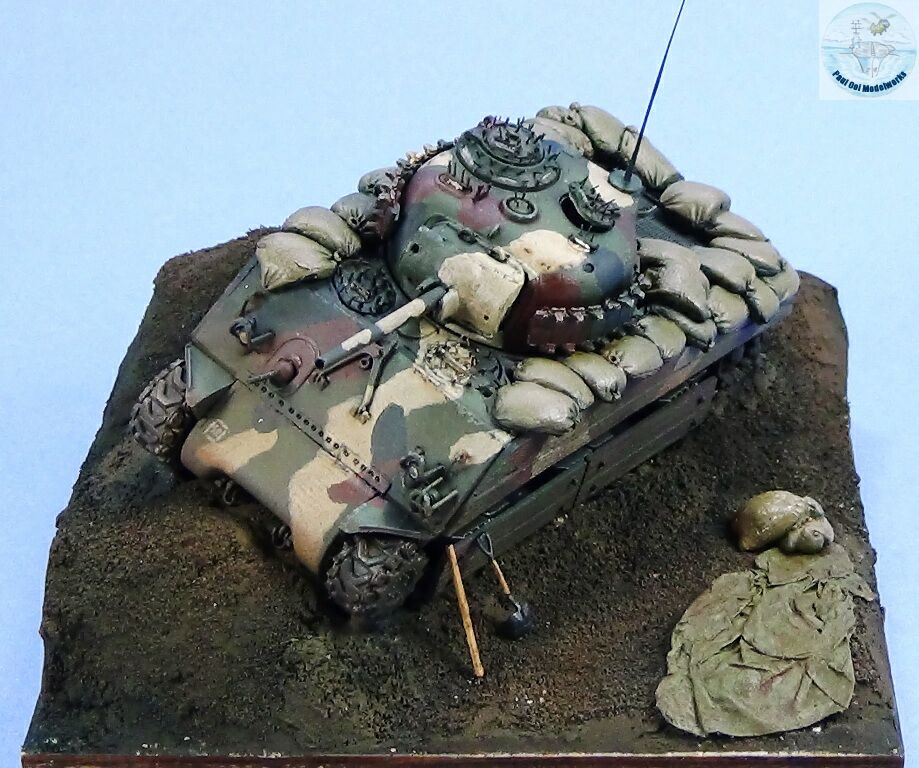
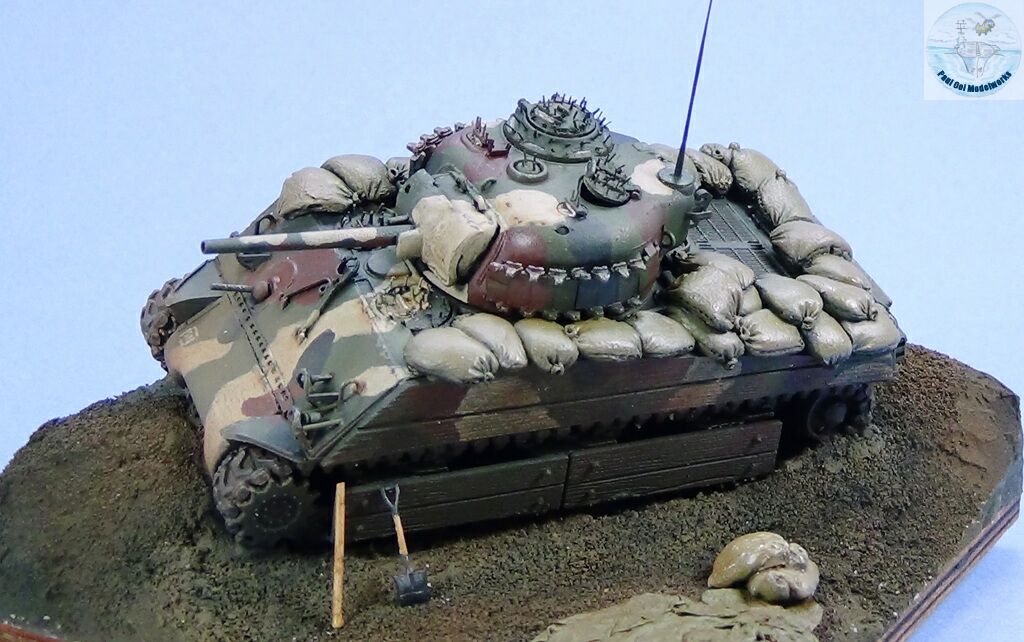
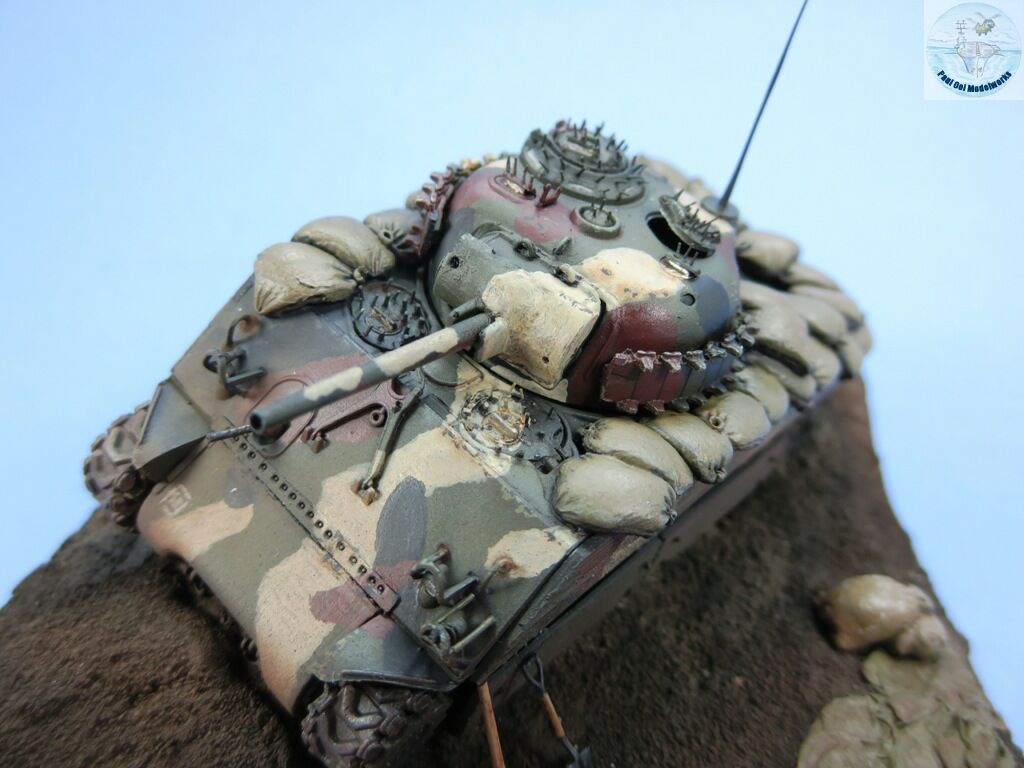
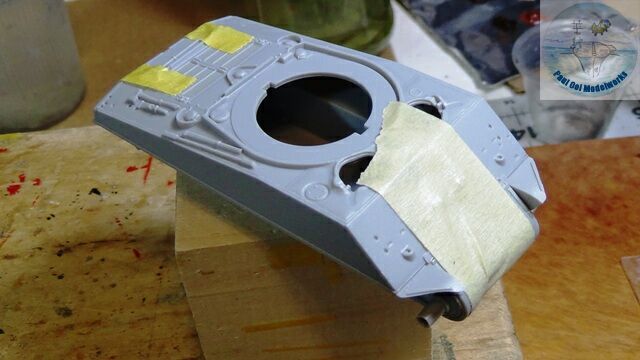
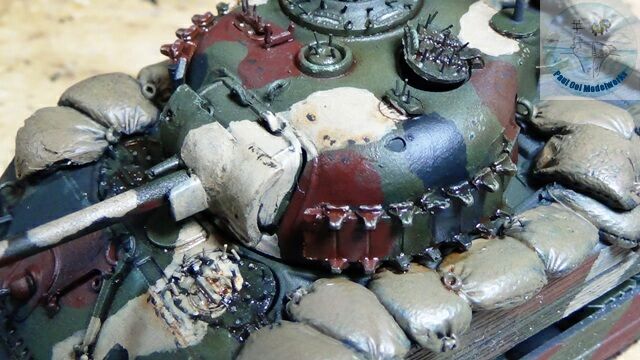
The turret sections were also assembled together and the resin gun and mantel grafted onto the plastic turret. Dry fitting had to be done many times to make sure that the pieces sit and fit well. Notice that I did not put in the hatches yet, as some of these had to be grafted on from resin parts.
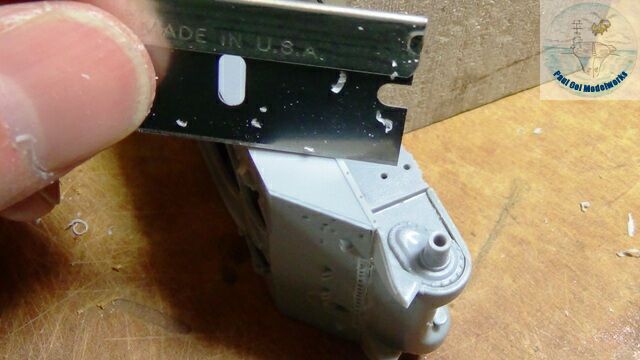
I scraped off some of the protruding molding lines off the side of the hull to enable the resin pieces of wooden sides to sit flat againt the hull (otherwise you will see a gap which did not look right).
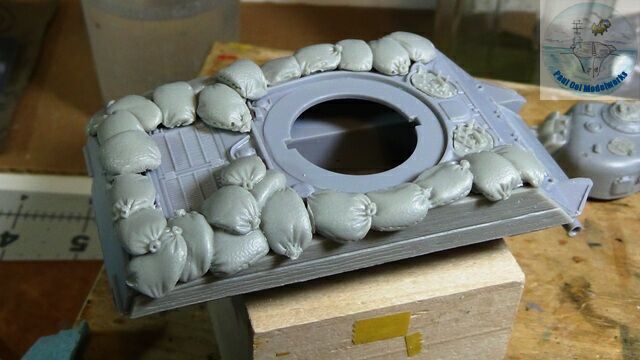
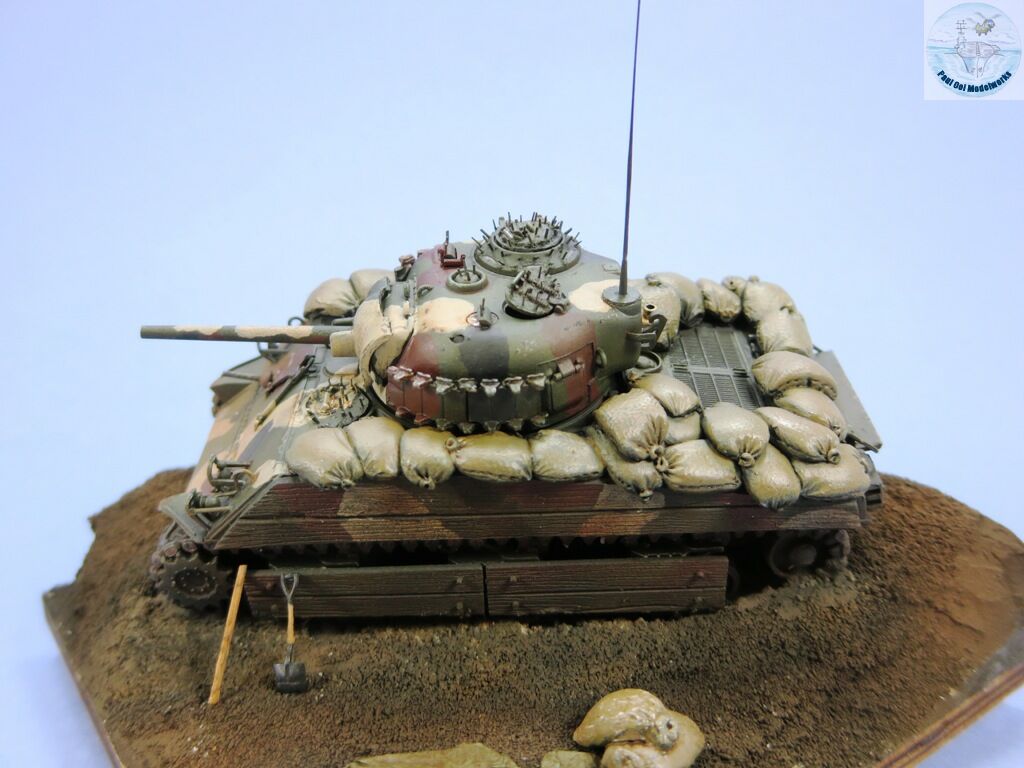
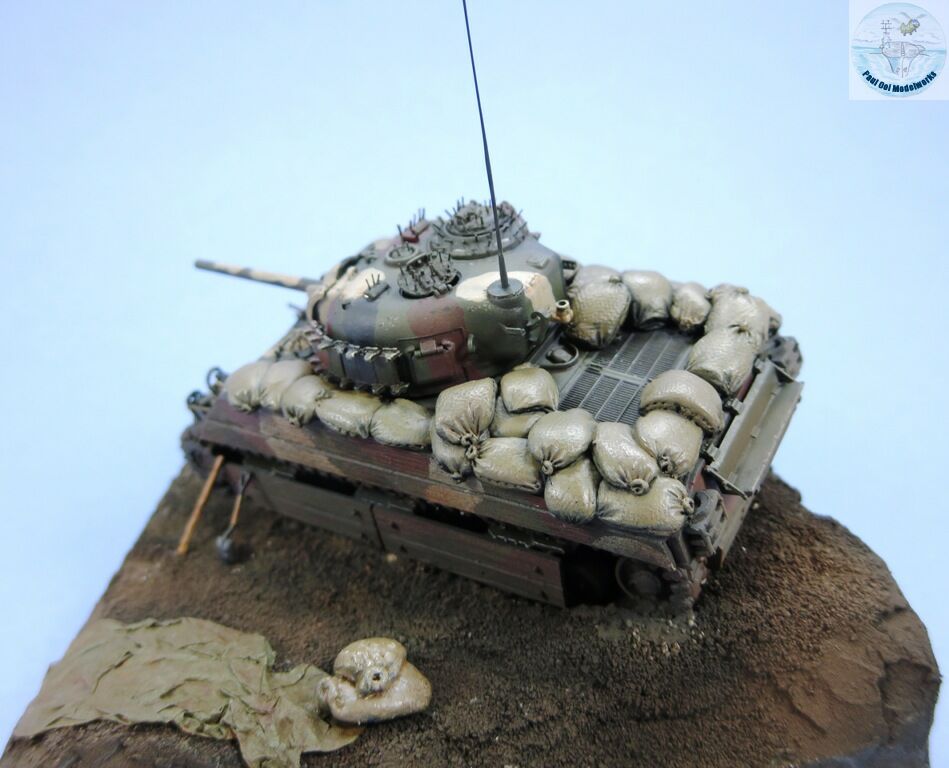
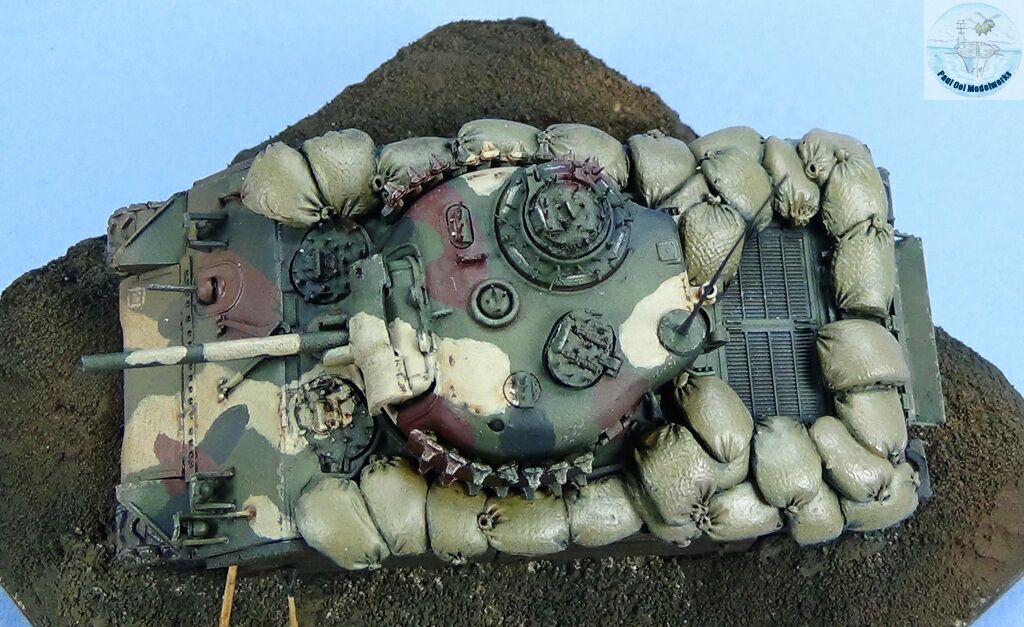
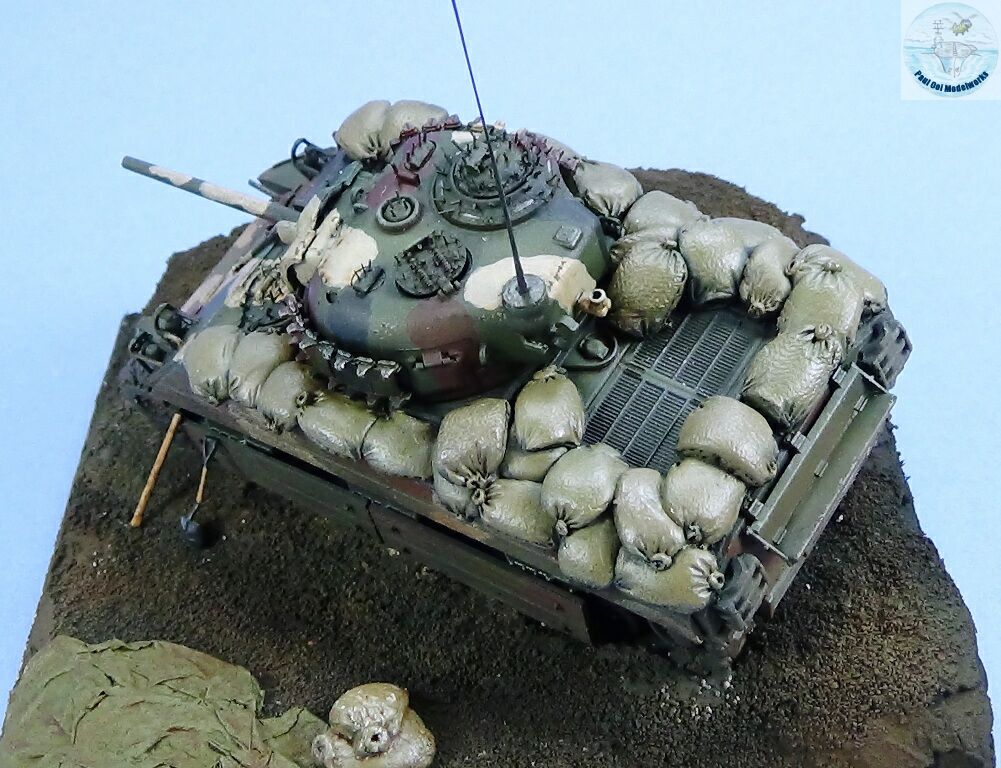
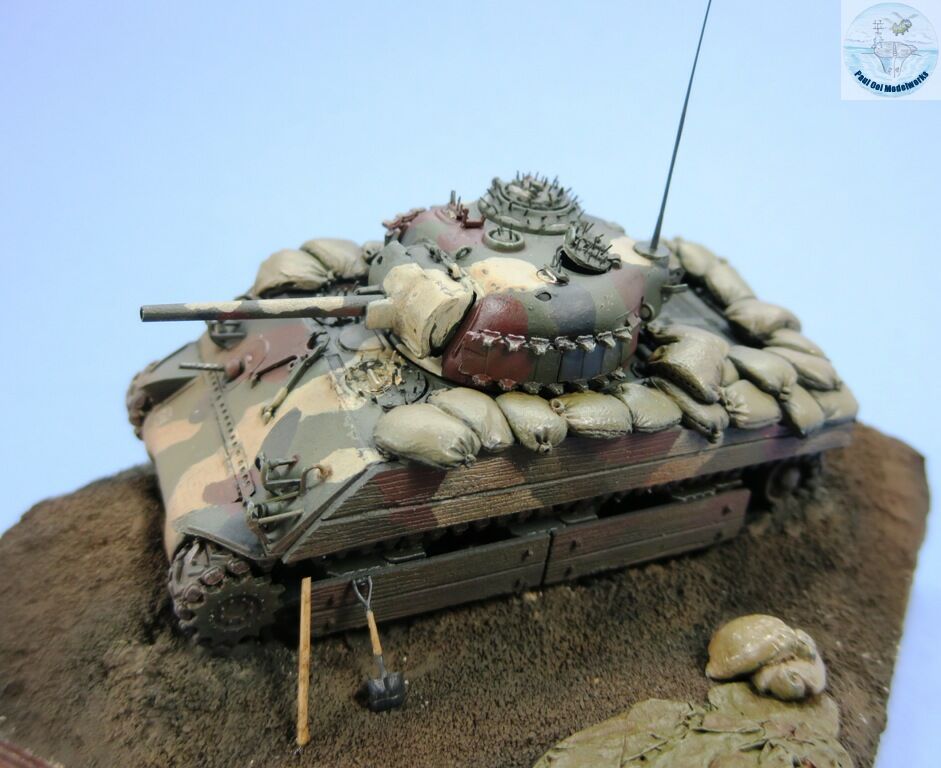
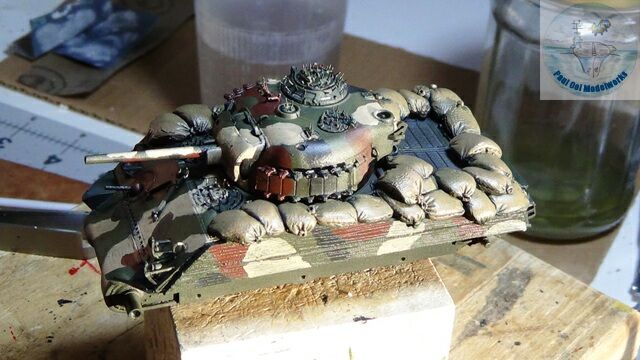
The sand bags are not individual pieces but two large panels (left and right sides) that fits onto the hull. Please leave off light moldings, side tools on the hull as these resin sandbags sit over the spots where these things would normally fit. It is far more important to get those sandbag panels to tightly fitted and pressed down so that they look realistic. Note also the presence of the “wooden side boards”.
At this stage more resin parts are fitted onto the turret and hull. As seen in the real picture, the Marines welded additional tank tracks onto the sides of the hull (giving that spiky dog collar look!).
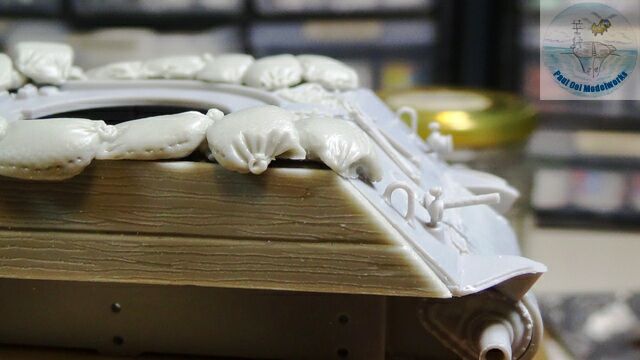
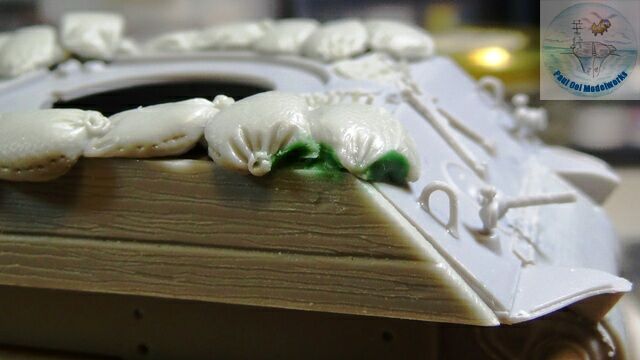
No matter how hard I tried to get the bags to “sit”, there were some areas where the resin parts “floated”. This is such a spoiler to the look of the tank, so I used Squadron green putty to fill the gaps between the hull and the underside of some of the bags. A little goes a long way, and once painted over, the bags look right on the hull of the tank.
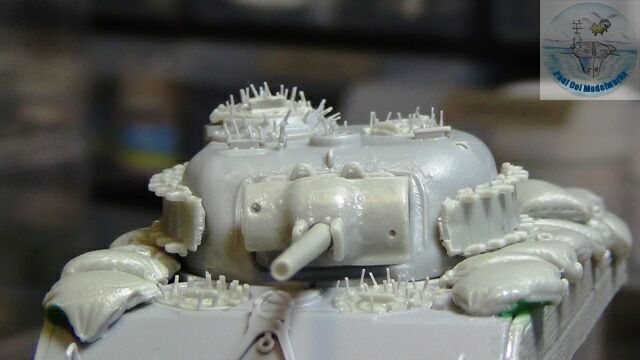
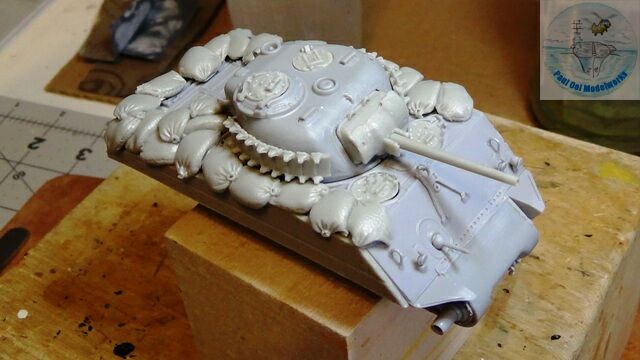
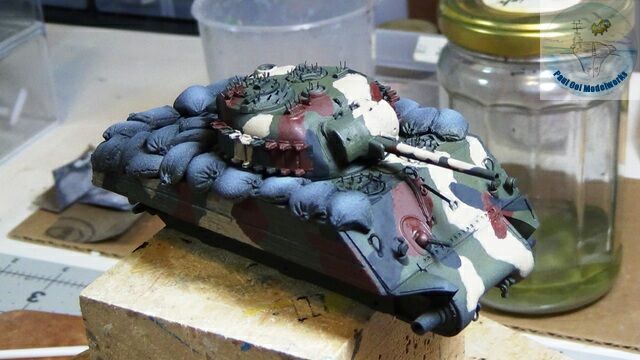
Remember the spiky hairdo this guy’s turret and hatches has? Most of those molded onto the hatches by Black Dog had snapped off during shipment in the box so one could either ignore the presence of these spikes on Iwo Jima, or “plant them” like some crazy people do. I went with the latter as nothing makes the ‘Iwo’ look like those nasty porcupine quills. I spent several painful hours using a a pair of tweezers, lots of stretch sprue cut into 1.5mm pins, slowly planting these spikes in rows on every hatch, cupola, and even peep holes and ventilation caps! But the finished product is its very own reward.
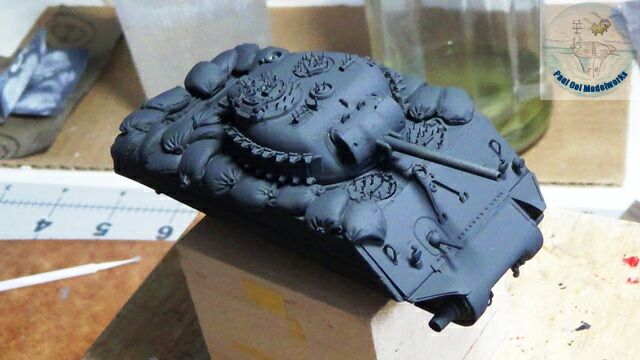
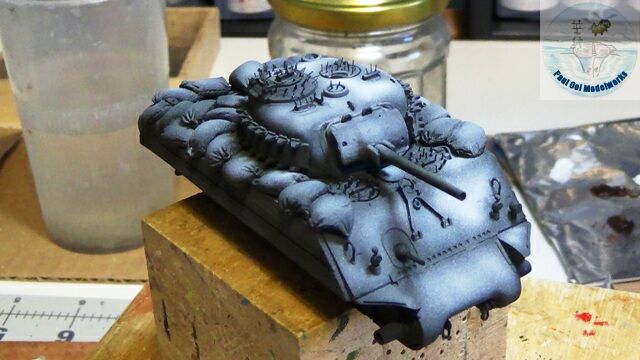
Priming is done with my favorite XF69 NATO Black followe by highlights using XF-2 Flat White.
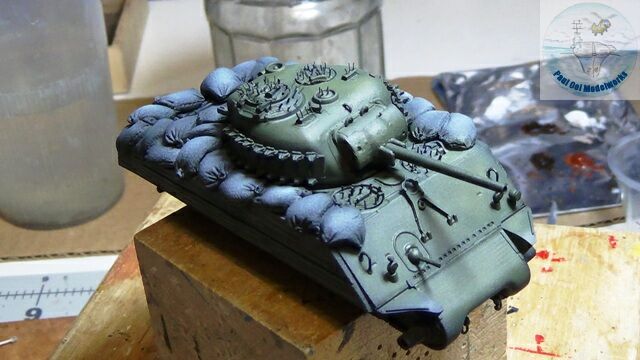
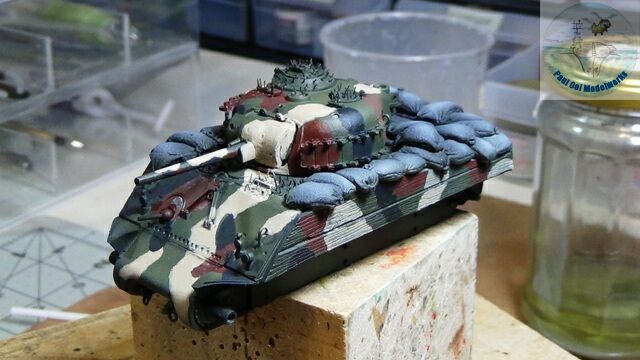
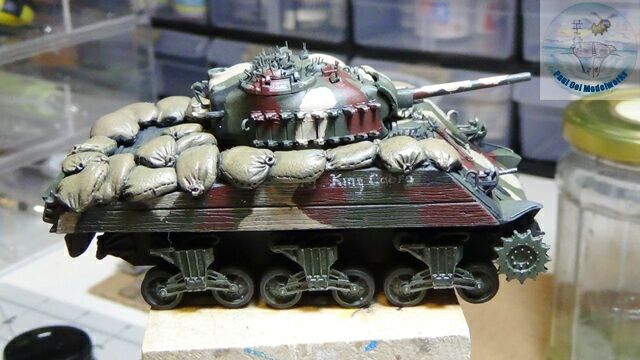
After airbrushing Model Masters Acrylic Marine Corp Green 4724, I carefully hand-painted all the other three colors, thinning the paint so that I get a smooth consistency. The three brushed colors were Tamiya Buff XF-57, Tamiya Hull Red XF-9, and Tamiya NATO Black XF-69.
The sandbags are brush-painted with Tamiya XF-49 Khaki.
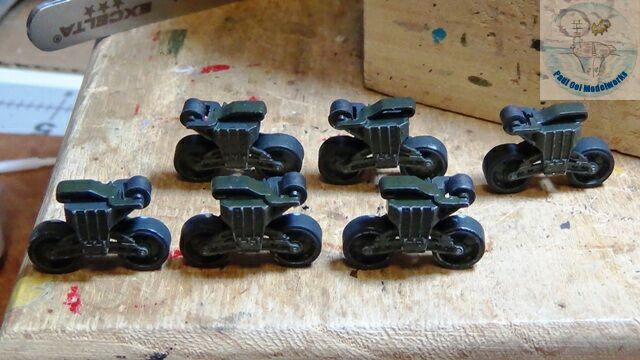
The wheel trucks (they look like little Kawasaki racer bikes) are mini-projects in their own right. I primed them in NATO Black, then hand-painted them with Marin Corp Green and highlights in SAC Bomber Green FS-34159.
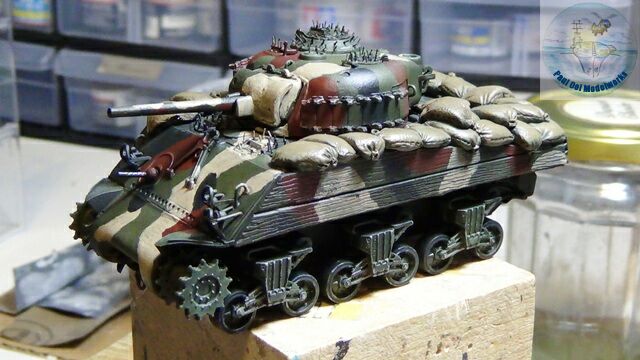
Once the wheel trucks are installed, the tank hull is given a wash of 1:1 Payne’s Grey and Burnt Umber.

Installing the tracks is tricky. First the tracks were painted in NATO Black, then weathered with Tamiya Red Brown in uneven patches, then highlighted with a graphite pencil. The track ends are bonded together with Cynoacrylate glue, and then installed and tensioned with the rear follower sprocket with super-fast curing Cynoacrylate. I confess that I hate installing tight tracks.
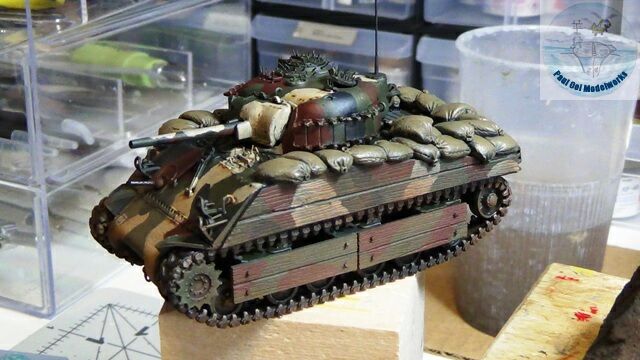
With the tracks safely in, I can mount the resin boards that cover the wheel trucks in Iwo Jima.
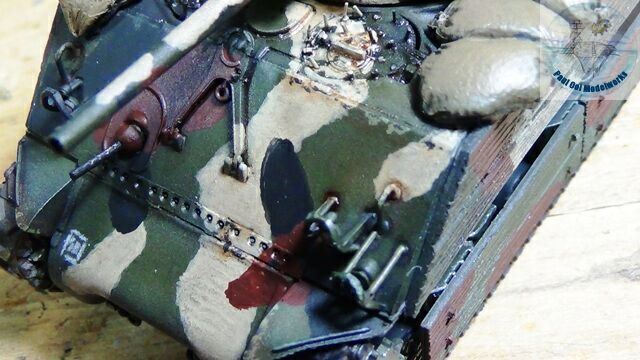
I weather the hull with paint chips and rust spots. Using a lighter shade of each camouflage color, I start at places of expected high wear, and in some areas, deepen the chips with small spots of black. Then I apply little spot wash of Burnt Sienna and Burnt Umber for growing rust spots.
Finally, I dust up the lower regions with a spray of Tamiya Red Brown, matching the color of the sand highlights.
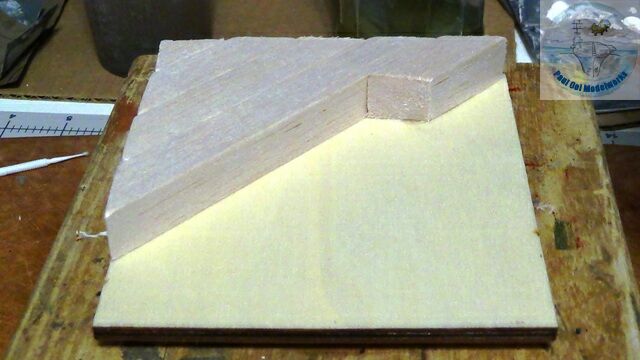
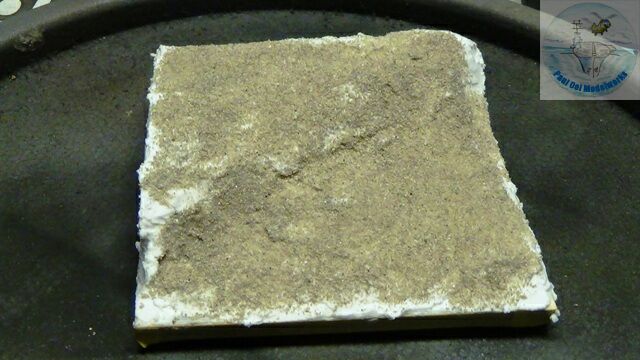
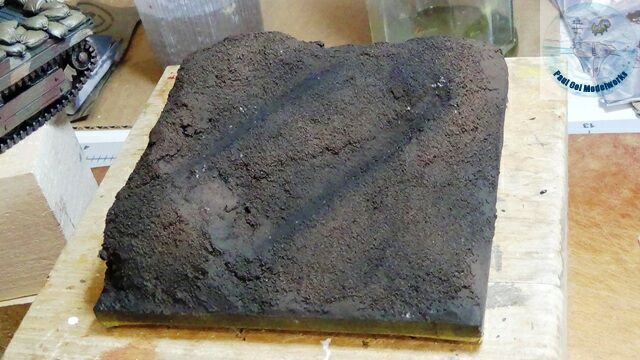
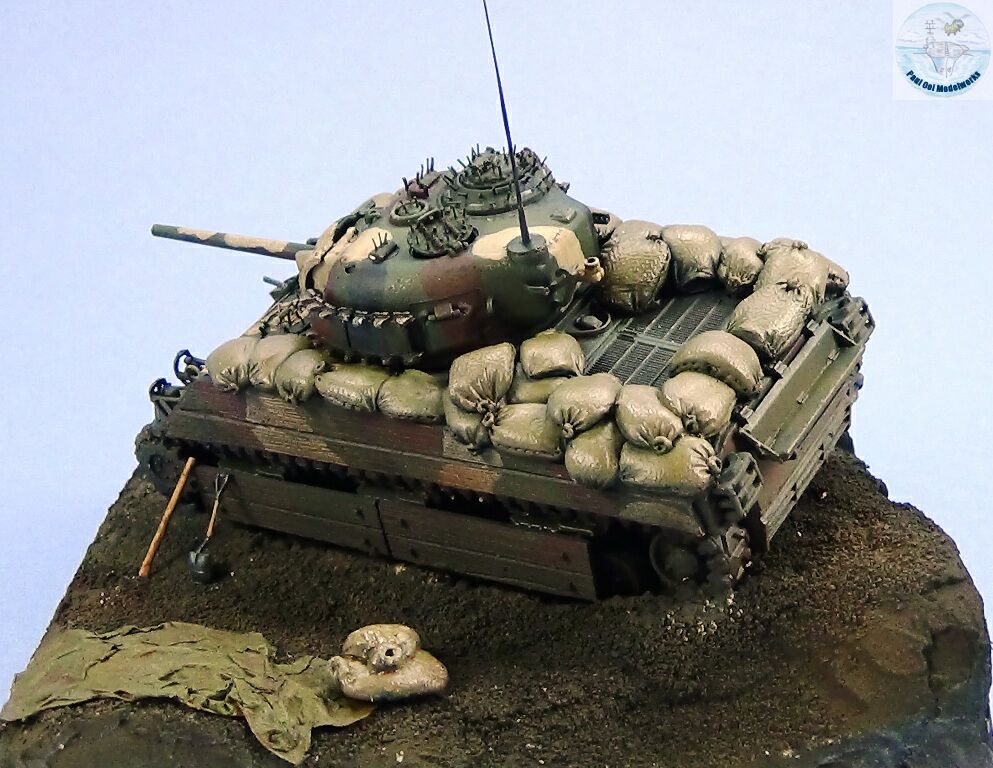
The base has to give the impression of how stuck this tank was. To provide some topography, I bonded strip of balsa wood onto the plywood square base. Then I coat this over with my usual technique of wall plaster, then textured with railway fine grey ballast. Then I undercoat with (yes!) NATO Black, followed by Red Brown highlights. This dark unusual finish is the black sand that was seen in the lower elevations of Iwo Jima. The sand wasn’t all black but could be seen to have a slight rust brown when the sunlight bounces off the slopes. Apart from being loose, they were sharp and nasty to work with. Before the plaster hardened, using plastic kitchen wrap to protect the model, I sank the tank tracks really deep to create the cavities to hold the trapped tank.
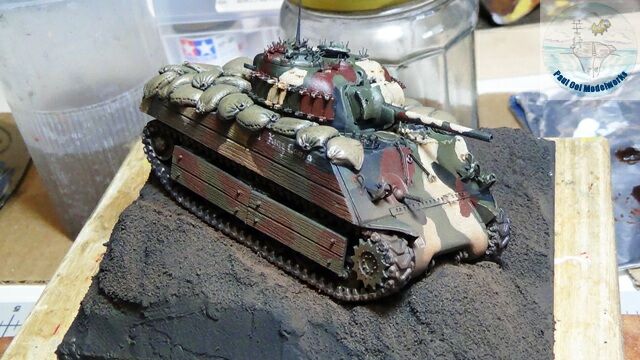
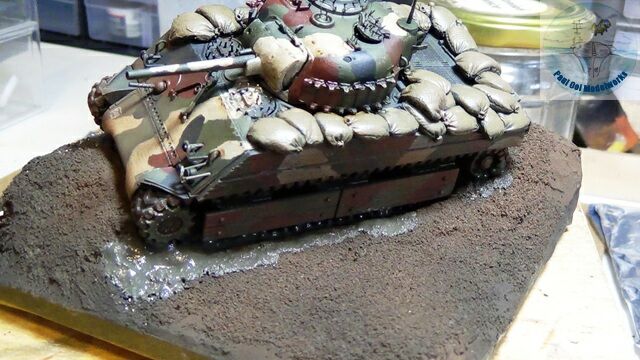
Then I mount the tank into the prepared cavities to give that really trapped look. However the tracks still look like they are RESTING ON the base, so I mixed a slurry using Vallejo Sandy Paste, titnted it with a mixture of NATO Black and red Brown and applied them into the edges of the cavity. Once that dried plus a bit more railway ballast applied while it was still wet, the tank looks truly STUCK!
Final touch of adding some digging tools (like the original picture), a tarp sheet strewn on the ground, and some sandbags and we have re-created the disabled Sherman on Iwo Jima.
u r the BEST!!!!