• Skip to primary navigation
  • Skip to main content
  • Skip to primary sidebar
  • Skip to footer
  • Home
  • Blog
  • About
  • The Fine Print
    • Disclaimer
    • Copyright
  • Privacy Policy
  • Contact
  • Paul Ooi Modelworks
  • Nav Social Menu

    • Email
    • Instagram
Paul Ooi Modelworks

Paul Ooi Modelworks

Building a better world, one scale model at a time

  • Index
    • Aircraft
      • WW1 Aircraft
      • Inter-War Aircraft
      • WW2 Allied Aircraft
      • WW2 Axis Aircraft
      • Modern Aircraft
    • Armored Fighting Vehicles
      • WW1 AFVs
      • WW2 AFVs
      • Tractors and Buldozers
      • Cold War AFVs
    • Ships
      • WW1 Ships
      • Inter-War Ships
      • WW2 Allied Ships
      • WW2 Axis Ships
      • Modern Ships
    • NordicCon Show
    • Figures
    • Buildings
    • Sci-Fi
    • Miscellaneous
  • Tutorials
    • Tutorial 1: Making a Wooden Platform Helipad
    • Tutorial 2: Wooden Hard Stand for Aircraft
    • Tutorial 3: Filling Large Plastic Seams
    • Tutorial 4: Diorama, Sicily 1943
    • Tutorial 5: Making a Gun Emplacement with Earthworks
    • Tutorial 6: Basic figure painting (1/35 scale or 54mm)
    • Tutorial 7: Filling Large Mouse Bite Gouges
    • Tutorial 8: Frames for Vacuum Formed Clear Canopies
    • Tutorial 9: Prepared Tank Position Diorama
    • Tutorial 10: Installing Multi-Piece Track System
    • Tutorial 11: Masking and Painting “Bird-Cage” Clear Canopies
    • Tutorial 12 – Aircraft Wing Tip Navigation Lights with Colored Bulbs
    • Tutorial 13 – Installing Wood Laminate Deck for Model Warships
    • Tutorial 14 – Painting a Rusted Muffler and Exhaust Pipe System

Tutorial 14 – Painting a Rusted Muffler and Exhaust Pipe System

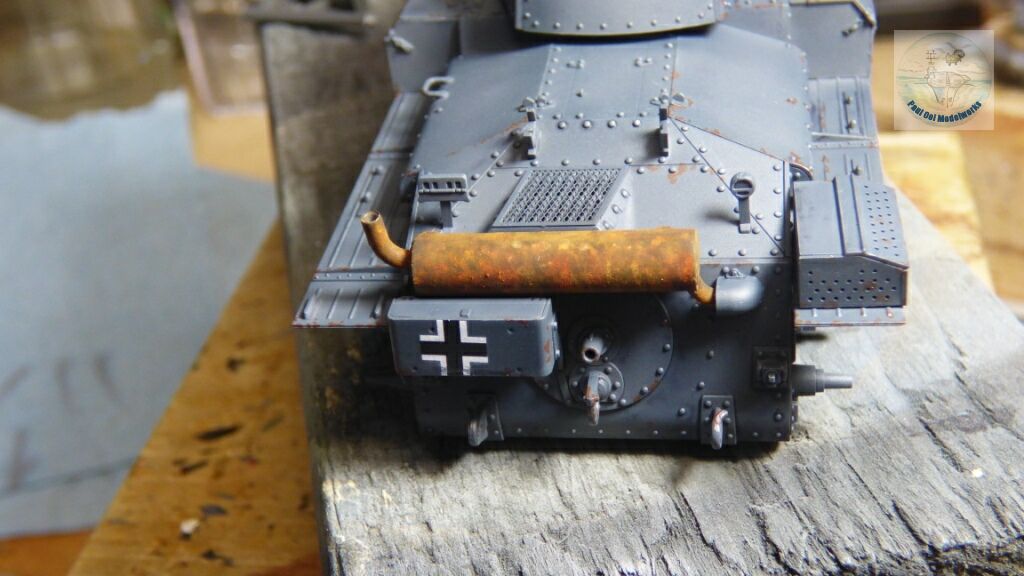
Getting the rusted look on a muffler, or an exhaust pipe system is not easy. The paint guide on the instruction sheet will often ask modelers to paint the item a uniform red brown (sometimes called ‘Rust’), or worse still, just plain black. Neither colors are right unless they portray vehicles that had never been used are painted with a red primer.

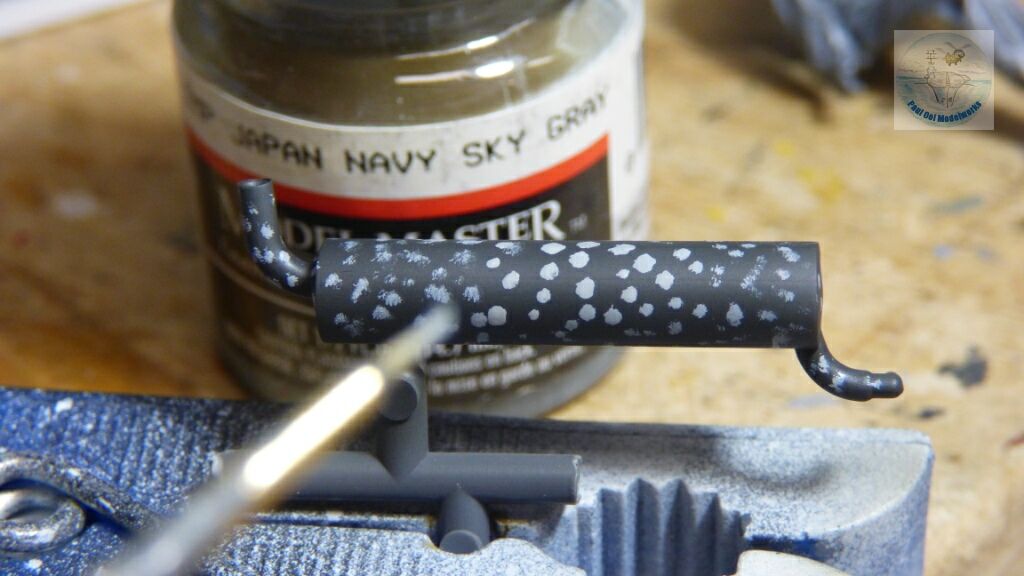
Start with painting the object with an acrylic base using a very dark grey like NATO Black or German Panzer Grey. Then apply an overall fine dot scheme of enamel or lacquer based light grey. Here, I am using IJN Sky Gray. The dot pattern should coincide with areas of heavy corrosion/rusting effect.

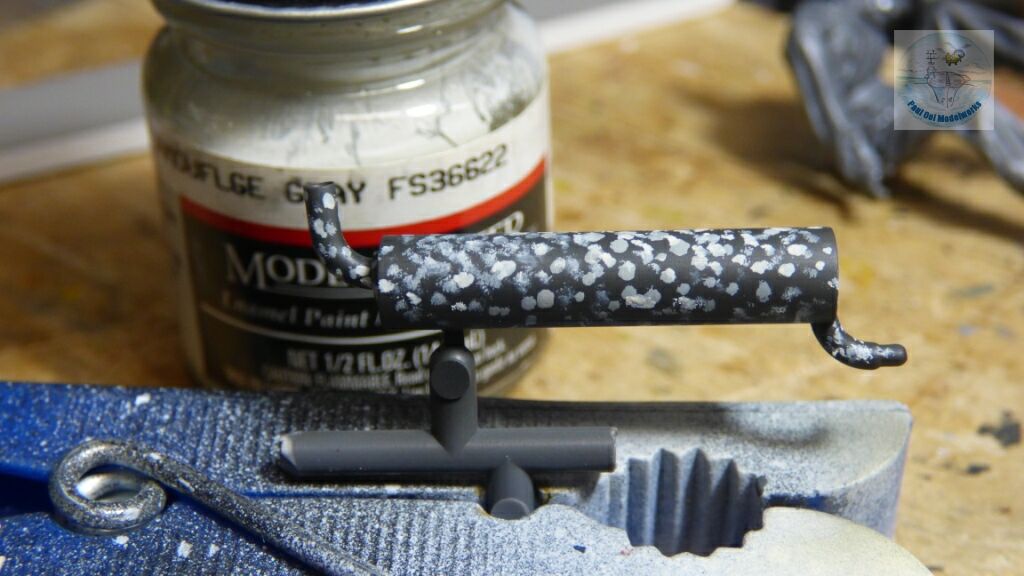
Next, applying another dot pattern of an even lighter shade of grey, off-white or while enamel paint (here, I am using Model Master Camouflage Grey FS36622. These will be areas of even greater heat corrosion.

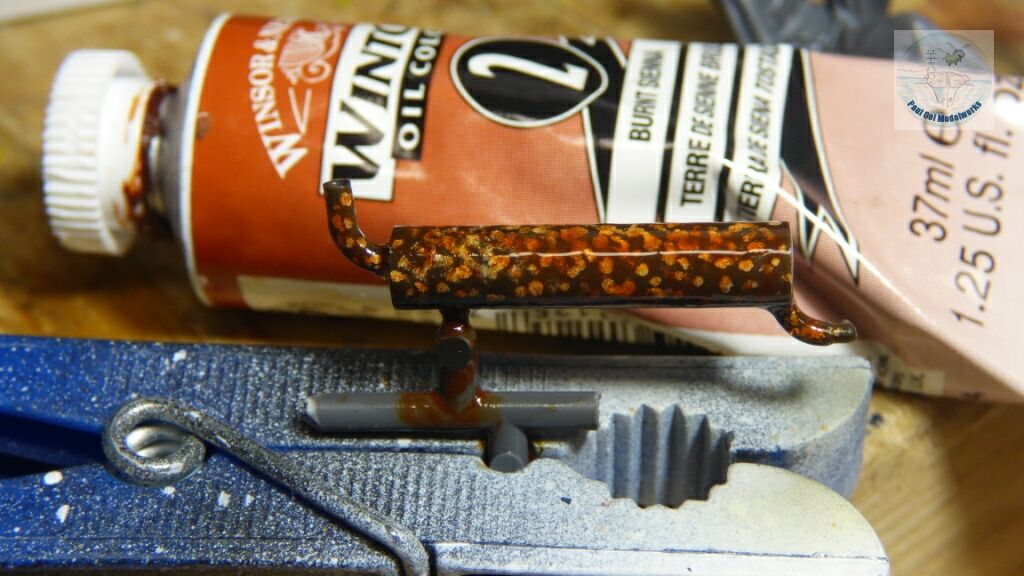
Apply a heavy thick oil wash of Burnt Sienna. Oil paint blob are OK as they simulate built up rust deposits. The oil solvent agent should be turpentine or turpenoid. The latter will partially dissolve the preceding enamel dots. That is the desired action, and should be left to do so. Leave to dry under a drying lamp if you have one. It will help the softening and dissolving action, but not too close in case you accidentally cook the part. Once dried, this will have a very strong and vivid orange hue. Do not worry!


Apply several layers of Sepia Shade from Vallejo wash range. This acrylic wash will tone down the strong Burnt Sienna oil wash nicely. Leave to dry.

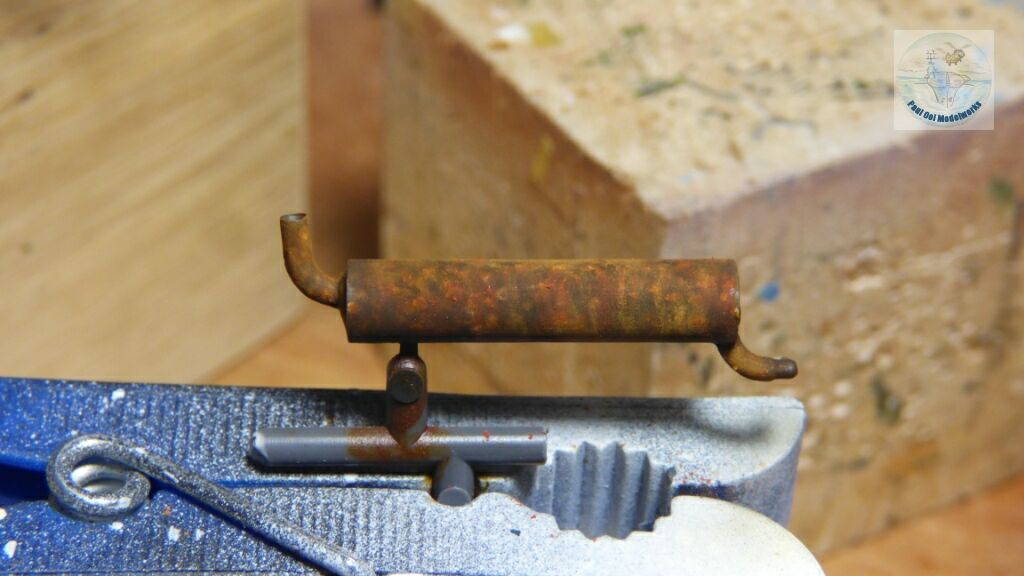
Once the sepia shade is dry, apply chalk pastel colours of red brown, orange, and even some bright yellow to simulate uneven rust wearing. The exhaust pipe sections have been re-created.

Primary Sidebar

Hey! It is nice to meet you!

Paul Ooi Modelworks welcomes casual visitors browsing, and enjoying the pictures as well as more serious fellow modelers looking for tips and references on the art of making miniatures and relishing in the challenge. I will be more than happy to answer any questions you may have about the models.

Please feel free to leave a comment or a question.

  • Email
  • Instagram

NEVER MISS A POST

Member of International List of Scale Model Related Web Sites

International List of Scale Model Related Web Sites

Paul Ooi Modelworks

NEVER MISS A POST

Sign up for notification on new posts.

Footer

  • Email
  • Instagram

Categories

  • Privacy Policy
  • Disclaimer
  • Copyright

© 2011–2025 · Paul Ooi Modelworks · All Rights Reserved