• Skip to primary navigation
  • Skip to main content
  • Skip to primary sidebar
  • Skip to footer
  • Home
  • Blog
  • About
  • The Fine Print
    • Disclaimer
    • Copyright
  • Privacy Policy
  • Contact
  • Paul Ooi Modelworks
  • Nav Social Menu

    • Email
    • Instagram
Paul Ooi Modelworks

Paul Ooi Modelworks

Building a better world, one scale model at a time

  • Index
    • Aircraft
      • WW1 Aircraft
      • Inter-War Aircraft
      • WW2 Allied Aircraft
      • WW2 Axis Aircraft
      • Modern Aircraft
    • Armored Fighting Vehicles
      • WW1 AFVs
      • WW2 AFVs
      • Tractors and Buldozers
      • Cold War AFVs
    • Ships
      • WW1 Ships
      • Inter-War Ships
      • WW2 Allied Ships
      • WW2 Axis Ships
      • Modern Ships
    • NordicCon Show
    • Figures
    • Buildings
    • Sci-Fi
    • Miscellaneous
  • Tutorials
    • Tutorial 1: Making a Wooden Platform Helipad
    • Tutorial 2: Wooden Hard Stand for Aircraft
    • Tutorial 3: Filling Large Plastic Seams
    • Tutorial 4: Diorama, Sicily 1943
    • Tutorial 5: Making a Gun Emplacement with Earthworks
    • Tutorial 6: Basic figure painting (1/35 scale or 54mm)
    • Tutorial 7: Filling Large Mouse Bite Gouges
    • Tutorial 8: Frames for Vacuum Formed Clear Canopies
    • Tutorial 9: Prepared Tank Position Diorama
    • Tutorial 10: Installing Multi-Piece Track System
    • Tutorial 11: Masking and Painting “Bird-Cage” Clear Canopies
    • Tutorial 12 – Aircraft Wing Tip Navigation Lights with Colored Bulbs
    • Tutorial 13 – Installing Wood Laminate Deck for Model Warships
    • Tutorial 14 – Painting a Rusted Muffler and Exhaust Pipe System
Home / Uncategorized / Tutorial 9: Prepared Tank Position Diorama

Tutorial 9: Prepared Tank Position Diorama

Uncategorized


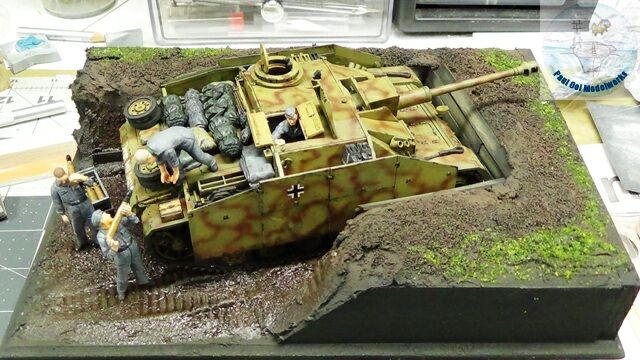
The prepared tank position makes an impressive display for a diorama. It can show how a tank is hidden ahead of a known battle, and provides for all kinds of improvisations. In this picture, you can see the crew of a German assault gun loading up the ammunition for a tough fight ahead. The techniques used in this tutorial can also be adapted for making trench scenes like those in the First World War.

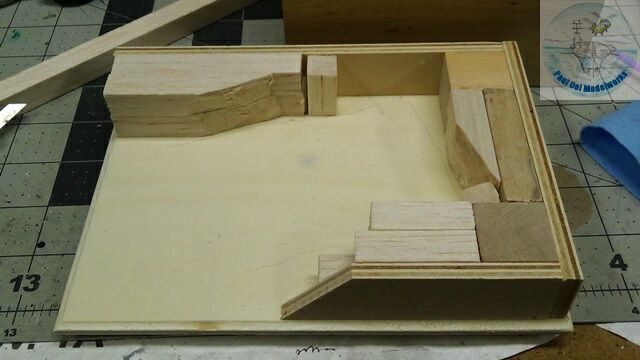
To make the basic foundations for the deep trench, I surrounded the edges with plywood sections that will provide the outer “walls” of the diorama. All the added wood sections are glued with a strong wood glue, and clamped if necessary. I use a combination of hobby store bass wood (pine) and balsa. The wood pieces are efficient in filling the dead space, and provide a strong base for the plaster. Please ensure that there is enough space allowance for the plaster or your trench space will become too narrow.

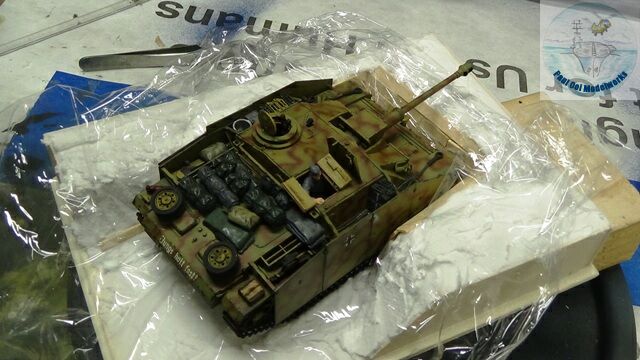
Once the wooden pieces are properly set, I apply the plaster (I use light spackle paste) and sculpt it to suit the desired soil texture. Next, I apply wood strips (available in model railway supply section) for the walls of the trench while the paste is still wet. In order to get the proper indentation of the tank tracks, and also for the vehicle to “sit’ into the ground, I spread kitchen cling wrap over the wet plaster. Then, I carefully position to model in place just long enough to make the impressions, and then remove the model. The cling wrap is also removed after that.

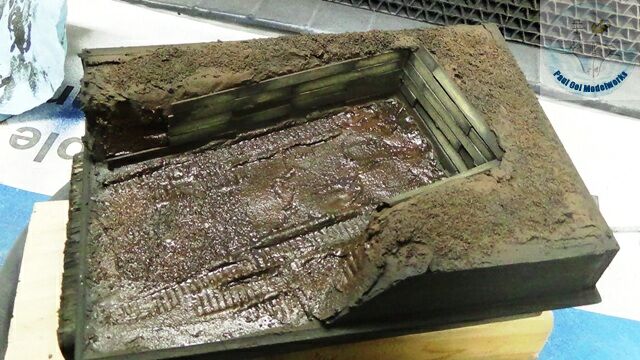
Once the plaster is cured, I spray paint the base in the following order:

  1. Overall Tamiya NATO Black on all soil surfaces. For the wooden strip walls, I only shade the edges with NAT Black, as the natural pine color is already best for wooden walls.
  2. Shades of varying intensity of Tamiya Red Brown XF64.
  3. Slight shades of Tamiya Dark Green XF61
  4. Small deposits of Vallejo Russian Splash Mud 73.802 along the lower edges of the wooden strip walls
  5. Vallejo Wet Effects 73.828 on the ground within the prepared space, giving it that glossy wet shine that you can see in the picture.

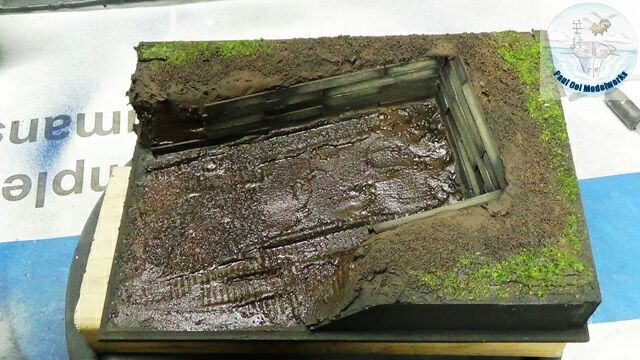
Lastly, apply shades of grass powder on the undisturbed soil surrounding the trench onto thinned white glue. The display base is all ready for the tank to move into.

November 13, 2023 · 3 Comments

Previous Post: « Taiwan’s Hughes MD500 ASW Defender- Compact Submarine Hunter
Next Post: Bogged Down – British Army Comet Mk. 1B in Hong Kong 1957 »

Reader Interactions

Leave a Reply Cancel reply

Your email address will not be published. Required fields are marked *

Comments

  1. Luis says

    September 24, 2024 at 7:30 am

    You just inspired me to build a diorama similar to yours. 😎 I’ve had a German tank for awhile

    Thanks 🙏🏻

    Reply
    • Paul says

      December 21, 2024 at 5:58 am

      Hello Luis,

      Good luck. German tank dioramas are always fun and there are so many subject material available.

      Paul

      Reply

Trackbacks

  1. Storm Preparation – Sturmgeschutz III Ausf. G in Russia 1943 says:
    November 13, 2023 at 5:01 pm

    […] Tutorial 9: Prepared Tank Position Diorama […]

    Reply

Primary Sidebar

Hey! It is nice to meet you!

Paul Ooi Modelworks welcomes casual visitors browsing, and enjoying the pictures as well as more serious fellow modelers looking for tips and references on the art of making miniatures and relishing in the challenge. I will be more than happy to answer any questions you may have about the models.

Please feel free to leave a comment or a question.

  • Email
  • Instagram

NEVER MISS A POST

Member of International List of Scale Model Related Web Sites

International List of Scale Model Related Web Sites

Paul Ooi Modelworks

NEVER MISS A POST

Sign up for notification on new posts.

Footer

  • Email
  • Instagram

Categories

  • Privacy Policy
  • Disclaimer
  • Copyright

© 2011–2026 · Paul Ooi Modelworks · All Rights Reserved