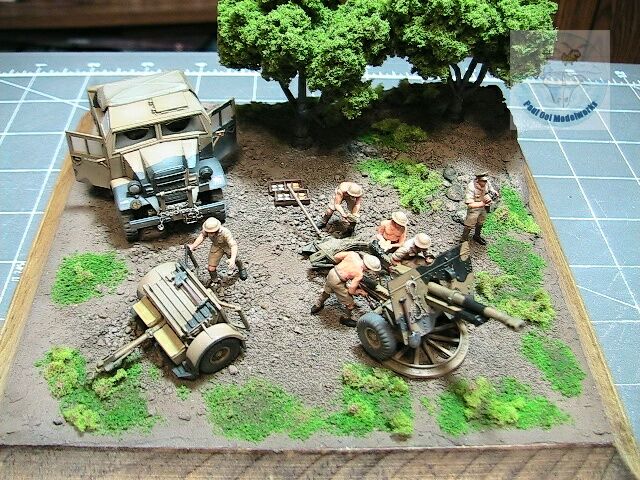
Battlefield dioramas are fun to make but getting the groundwork in proper order and having a firm permanent base is always a challenge. Many materials seem suitable until one realizes that the media shrinks as it dries, cracks, or never dries at all. And then there is the issue of painting and providing the ground texture without making things appear over-scale. If one could get past these issues, then planning and making dioramas can be a lot of fun. There is nothing like providing your precious model a backdrop and context to tell a story, not just a sterile display suspended on a wooden base or black acrylic.

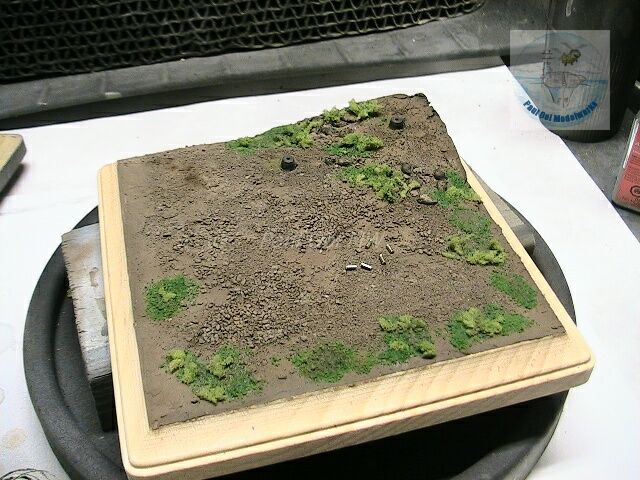
I start with a bass wood base, in this case a 4″ x 4″ plinth. To protect the edges from the mess to come, I mask them off with tape. Then using a pallet knife, I apply dry-wall plaster available in most hardware stores. Select a plaster that is non-shrinking and light weight. Some of the heavier plasters can have a lot of moisture and could also warp the wooden base.

Using a few different shapes of pallet knives (these are cheap disposable plastic pallet knives that come a in a single pack, but I have been re-using them for 5 years), I work the surface until I get the shape and texture that I want. At this time, I also build the topography of the diorama, giving some elevation for where the olive trees will go later. This provides some perspective and interest to the scene later on. For more dramatic heights and drops, these will be found in future tutorials.

While the plaster is still wet, carefully apply rock debris to create the ground texture. I used several grade sizes of rock talus and railway ballast from Woodland Scenics. Do not use only one size of talus since it would be unnatural to have that uniformity unless you are portraying a rock quarry pile. Press in the rocks to embed them and shake off the excess carefully. I also “plant” the trees at this time, using only the tree stump base in the case of the Woodland Scenic trees. The alternative would be to drill holes into the plaster later on after it has dried.

Once the plaster has dried properly, at least 6 hours in my case or better still to leave it overnight in a well ventilated space, painting can start. I begin with an airbrushed undercoat of dark grey or black to provide shadows for the rocks and also to provide a basic layer to block out the original white material. You can also use a brush if you prefer that, except that it tends to lift some of the rock and talus when the bristles come into contact.

This is followed by several layers of basic earth color. In this case, I mixed Tamiya Acrylic Desert Yellow, Dark Earth and a little white. You can study pictures of your locality and make adjustments for sun glare, season, etc. The other plus point of using an airbrush is that one can vary the intensity and coverage to provide an uneven tone to the ground, just like the real thing.

Once the paint is dry, I apply a wash of oil paint and turpentine, in this case Burnt Umber. This helps to bring out some of the ground detail and deepen some of the rock shadows. The whole work is then sprayed with Dullcote.

I attach the trees to check for effect. Perfect!

To “plant” the ground cover, I apply diluted white glue (2 parts glue:1 part water) using a brush to approximate the area of grass and bushes.

Using Woodlands Scenic foliage (light green) and grass (middle green), I apply these while setting the diorama in a pan, so that I can remove the excess. Once the grass is set, the effect should be just about right. Just don’t over-do apply the grass. A little goes a long way. If the effect is too stark against the ground, just apply a slight mist of the ground color (dilute 3 parts thinner: 1 part paint) over the foliage with an airbrush set at very low pressure (about 5-7 psi) to reduce the contrast, or apply the same mix using a brush to soak onto the grass.
Then you can start arranging the figures, vehicles, accessories. Fun!

