The Zero is the ultimately symbol of Japanese WW2 military aviation. To many people, any Japanese fighter aircraft would be a “Zero” (even among the Japanese). This 1/48th scale Tamiya kit of the A6M5c portrays one of the final configurations of the famous fighter and incorporated many defensive features, like heavy armor plating to protect the pilot’s rear and self-sealing fuel tanks to prevent fires when struck by incendiary rounds. This Tamiya kit is a veteran from 1982 but the fit and amount of details made it a standard for many years until the Hasegawa kits came along and recently, Tamiya re-issued the Zeke in 1/48th scale format with all new tooling at 3 times the cost.

I augmented this classic with new photo-etched frets from Eduard’s Big Ed series. This package came with the interior details, exterior wheel wells, flap details and canopy masks. Although intended for the new Tamiya kit, the fit was good and with several minor modifications, worked just as well on the 1982 molds.

As usual, we start with the cockpit. Japanese aircraft interior from WW2 vary according to the aircraft manufacturer. In the case of the Zero, while Mitsubishi was the original manufacturer, by mid-war, Nakajima was also making the same aircraft for the JNAF. The interior color for Nakajima was an anti-corrosion blue lacquer applied over the bare metal, giving it a metallic blue color. I decide to adopt this color for variety and interest over the usual Mitsubishi middle green. The resulting Nakajima-built cockpit was a combination of green instrument panels and metallic blue walls. I also drilled out the holes on the metal bucket seat that came with the kit since this feature will be clearly seen after the cockpit has been sealed into the fuselage.

The other major operation was to cut out the underside flaps from the wings to install the flaps interior details. The panels were cut away very carefully using a scribing tool and then the edges lightly sanded. On the reverse set of wings, the inner surface also had to be sanded down with a machine tool to open up the space to house the wedge-shaped housing for the ribs.


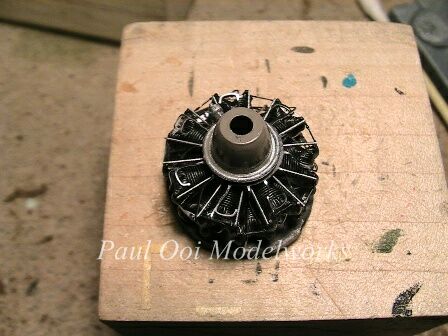
The fuselage and wings came together easily with only minor gap-filling needed at the wing root. The next major assembly was the radial engine block. The kit’s parts did not have the cam rods that are normally found in newer kits. I added plastic rods to make those (all 28 of them), followed by the wire brackets and the main wire harness. By the time I was done with it, all that was missing was aviation fuel and spark plugs !!!

Then, the whole assembly gets hidden inside the cowling and all you get to see is a glimpse of the front side around the propeller spinner. For the cowling flaps, photo-etched panels were installed to replace the kit’s thicker parts. The 7 exhaust pipes are carefully positioned and test fitted against the fuselage to make sure that everything falls into place.

The whole fuselage is then under-coated with aluminum plate metalizer paint from Model Masters. This was then followed by Japanese Navy grey for the underside and then Japanese Navy Green (Mitsubishi), lightened by 20% White for the topside. The wheel wells and flaps were painted with metallic blue, similar to cockpit interior. After the paint has dried, I coated the whole aircraft with sealing varnish in preparation for decal application.


For the markings and color scheme, I chose the one with the most impressive white chevrons across the fuselage. This aircraft belonged to the 203rd Flying Group (Kokutai), Imperial Japanese Navy Air Force based in Ohmura Air Base on Kyushu. This unit was tasked with interception of B-29 formations approaching Japan from Saipan, as well as fleet interdiction during the Okinawa campaign. This particular aircraft was armed with two 60kg air-to-air rockets under the wings. The kit did not come with the decals for the 2 flanking red boxes seen on the wing. I searched my spare decals bin and garnered enough red decals to cut into the strips needed for making the boxes. After the decals, the whole aircraft was coated with another layer of varnish.


While the fuselage varnish cured, I finished the other details like the propeller and spinner and the rockets.


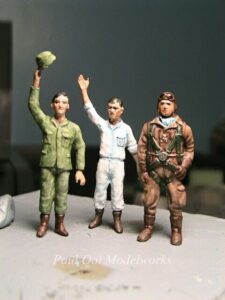
Now, onto the rest of the cast. I have included the figure of the pilot, the petty officer (crew chief) and one mechanic in the picture. After cleaning up the figures and removing the flash lines, I undercoat them in grey. At this moment, they would do fine for a Japanese zombie movie. Then I finish them in acrylic and oil paints and a final coating of Dullcote varnish.

After this, all the different pieces were arranged on the wooden plinth and this project is all ready for the collector who ordered it. For the rest of us, we have the following pictures of the project.


Paul,
You’ve outdone yourself again. Thanks for sharing so much detail on your techniques for customizing features like the flap interior details, the engine and cockpit details.
One question: This late-model version of the Zero appears to have four 20mm cannon (rather than the two cannon in the earlier versions – augmented by twin 7.7mm guns above the engine). Did this late-model Zero also have the twin 7.7mm guns – or only the four cannon?
Your “nose-on” photo seems to show two recessed features in the top of the cowling to accommodate the twin 7.7mm guns – but I can’t tell for sure. If this bird was intended to serve as a “B-29 killer” – the added weight of these two 7.7mm “pea shooter” guns and ammo would seem to be counterproductive.
Thanks as always for sharing you passion and precision.
Hello Dave,
The wings have one 20 mm and 13.2mm on each side while the twin engine mounts had only one 13.2 mm on the starboard side, the port side space being left empty. In actual late war missions, to compensate for the two 60kg rockets, the wing 13.2mm machine guns were not loaded or had reduced belts.They counted on the quick (and dangerous) approach to “B-san” using bursts of cannon fire and the rockets to do the job and then fall away before the fighter escorts can get them. The single loaded 13.2mm in the cowling was meant for last ditch self-defense against US fighters and did not have enough stopping power on the B-29’s.
Takes an observant eye to notice the two cowling gun ports. I deliberately drilled them out so that one can actually see all the way to the gun muzzle on the starboard side. The port side stares into a void where the other machine gun should have been.