The German Army Air Service (Luftstreitskrafte) in WW1 certainly captured the imagination of many writers with the likes of Manfred von Richtofen and Werner Voss. One recent movie even mistakenly portrayed what seemed like the ENTIRE German fighter force equipped only with Fokker Dr.1 Triplane when the large majority were either various versions of the Albatros or other models of Fokkers and Pfalzs. What was even more obscure was the air force (Luftfahrtruppen) of that other central European power, the Austro-Hungarian empire.
The Germans shipped the basic Albatros D.III design to Austria and the result was the Oeffag (Oesterreichische Flugzeugfabrik AG) 53, 153 and 253 fighters. Significant changes from the original German Albatros were made by adding a more powerful engine in the form of the 180 hp Austro-Daimler, Austrian Schwarzlose machine guns and strengthened lower wings. The 153 and 253 versions also dispensed with the bullet-shaped spinner that gave the Albatros it’s characteristic shark-like profile and turned the Austrian fighter into a pug-nosed aircraft.

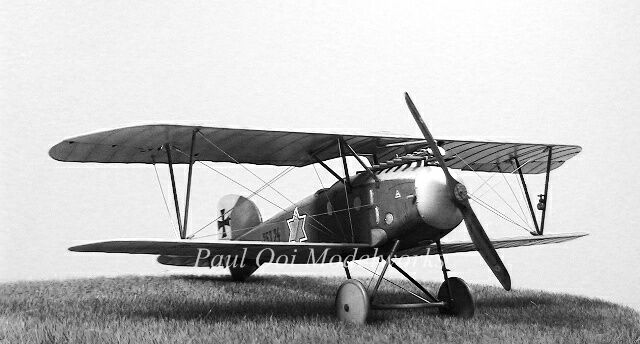
Recently, Eduard from the Czech Republic issued a whole series of kits based on the Oeffag-built Albatros which was a welcomed addition to available WW1 aircraft in 1/48th scale. This particular kit came with very well-molded plastic parts, two photo-etched frets and masking tape for the wheels. I chose to build machine number 253.24 operating out of Ghirano in the summer of 1918 piloted by Austrian ace Oberleutnant Benno Fiala (28 kills) of Flik 51/J. This aircraft had unit markings that closely resembled a Star-of-David in red and yellow, coupled with the common German and Austrian Eisernes Kreuz, a most curious combination in the light of later history.

The build starts with the Austro-Daimler engine and given the number of parts involved (including photo-etched placards), this could well be a kit-within-a-kit. I finished the engine in black and aluminum and a wash of Tamiya Nato Black and smoke to get it to look a little grimy. A pity that the lower half of that engine will be hidden under the wooden support platform later.

Next, I started painting the inner wall so the cockpit which was dominated by varnished wood panels. I derived my wood painting techniques from a wonderful article on that subject by Eric Larson in May 2011’s issue of Airfix magazine.

The cockpit details are excellent with a lot crammed into the fuselage. It requires careful assembly as the two Schwarzlose machine guns have this unusual arrange with super-long barrels poking through the engine block area all the way back from the cockpit bulkhead. The pre-printed dial faces are such a delight as the wooden instrument panels just come to life when these get added. The picture also gives the reader a good idea of what a cross-section of the cockpit and engine area should look like.

Then comes the all-important closing of the fuselage, except that in this case, the interior details are still visible for a while until we add the top mantel piece with the machine aluminum finish. I use clamps to get the halves to fix properly since there are NO locating lugs. This baby gets to dry for a full day while I get back to my alter ego as a bespectacled mild-mannered engineer.

The fuselage top mantel piece and nose panel are pre-painted in Alclad black primer followed by Alclad dull aluminum which gave the kit the actual WW1 look as opposed to the suggested flat medium grey in the paint guide provided by Eduard. One cannot say enough about this great metal finish paint and it stands up to the needed masking work shortly after.

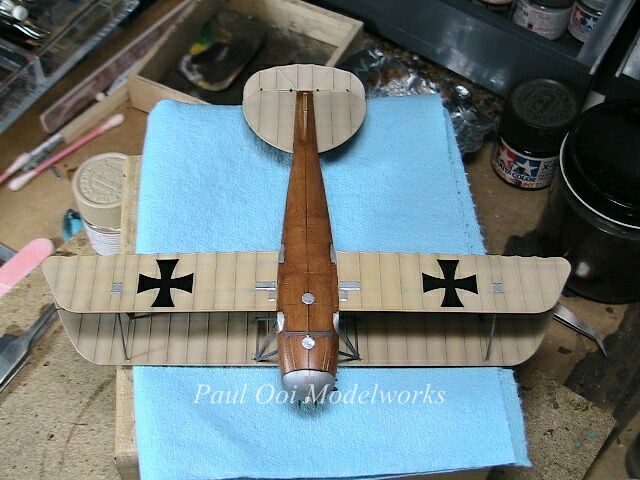
Once the fuselage is properly masked, the job of painting the entire fuselage in wood paneling (the ultimate Woody) starts. Again I recommend Eric Larson’s article that gives a blow-by-blow account. Another place for on-line reference is Wingnuts’ reference on painting wooden finishes. All I can say is that it was time-consuming, requires some patience and a good place to keep the dust away while it dries. The results are….you can judge for yourselves in the subsequent pictures.

While the fuselage was going through its multiple layers of paint to achieve the final wood finish, I got working on the various fabric covered sections of the wings, rudder and rear stabilizers. The wings needed to achieve the effect of metal framing showing through the bleached doped linen (unpainted). This also requires extensive paint treatment detailed in the same Airfix article. I used Tamiya XF52 Buff as the starting shade and went incrementally lighter by mixing XF2 White to get the ribbing effect.

While waiting for all these major parts to dry, I got working on creating the laminated wood look for the propeller, starting with Desert Yellow and then masking off in strips to over-spray with Tamiya Red Brown, followed by a final finishing glaze using Burnt Umber oil paint.

Finally “Woody” is good to go and I protected the whole structure under a layer of varnish. I had to really check to make sure that the paint was dry in order not to add my fingerprints as part of the wood grain!

I decide to apply the decals on the fuselage and various wing sections before assembly since access becomes impossible with the wing struts in place.

The lower wings attachments to the wing root are extremely tenuous and requires careful attachment with CA glue and letting them set properly. Any undue force and the lower wings will come right off the fuselage.

Finally I embark on attaching the upper wing onto the struts. Alignment is still tricky but not the nightmare that was the Gotha project (see previous post).


Once the struts are dry and rigid enough, I flip the assembly over to start working on the undercarriage. Given the small cross sections to work on, I am forever thankful for the advent of CA glue. The aircraft finally gets to sit on its own wheels.

Then comes the painstaking work of rigging the aircraft with 0.15mm (.006 inches) brass wire and brass tubing for the turn buckles. With bi-planes this is an indispensable part of the model and very nerve wracking despite the many times that I have done this. Finally the aircraft is ready to be placed on its display.

The base is made from an oval pine board and covered with an excellent wild grass mat from Busch available in the hobby train section.
Enjoy the pictures and have a Happy New Year 2012!


Hello Paul,
Your Albatros is excellent. Not knowing better I bought the Glencoe Austro-Hungarian Albatros Diii. It’s pretty bad, even by my standards – I am re-entering model building after many years off. Maybe you could give me some advice:
On some Albatros models I’ve seen there is a visable line along the spine of the fuselage (yours has it) both on the top and bottom. Some don’t have it. Which is right?
What about rib tapping? Did all WWI fabric covered planes have it? Or is is not that visable on 1/48 scale? Sometimes it is very pronounced and others not.
Thanks, and again your Albatros is really nice and seeing it really makes me want to do better.
Hello Vincent,
Yes, the Glencoe kits are from a different era of plastic models and cannot compare in fit and detail with Eduard and certainly not with the magnificent Wingnuts kits. Still one can also take the challenge of building a good replica out of an old kit and bring it to modern standards (see my Gloster Gladiator build).There are very few original OEFFAG (if any) preserved today, so some aspects of their paneling are lost in time. If you look at the body panels over the top, the plywood bending for the D.III and even more so for the D.Va would have been very extreme in a complete U if there was no spinal joint. Most modern 3D re-construction pictures show a faint spinal line. So at the end of the day, it’s up to you.
As for rib-taping, It become more common in the later biplanes. Even if they were taped, in real life, it would be very faint or not visible in 1/48 scale. When viewing a 1/48 scale model at say, 16 inches distance, that would be 64 scale feet away. How much of a tape can one see at that distance is conjectural. Some kit makers mold the tape on the ribs in for visual effect and it looks “right”.The same problem exists with some kits having very pronounced ribs molded into the wings. Actual museum specimens will give a better feel of the subject. If you ever make it to one of these aviation museum, trying standing at the scale distance of 60 plus feet and take a photograph and see if it matches your kit.
Paul
Hi
An austrain hungary modelplane you can just send!
Adress:
Daniel Johnsson
Källvägen 4
37439 Karlshamn
Dear Daniel,
Thank you for your interest. I will contact you via email directly.
Paul